HOME ABOUT REVIEWS INTERVIEWS SUBSCRIBE CONTACT FACEBOOK TWITTER

Pear Cake Recipe

pear cakeFrom Clean Start by Terry Walters...

The inspiration for this recipe came from my friend Vicki, who is hands-down the best baker I know. Her super-moist apple cake is just the right combination of light and sweet. And, while I've still not been able to convince her to share her recipe, this gluten-free pear version satisfied my craving with ease. I would like to think that someday Vicki might actually ask me for this recipe, but I guess that's unnecessary now!

Ingredients:
Dry:
1 cup chickpea flour
1 cup almond meal
1/2 cup potato starch
1 tbsp baking powder
1 tspn baking soda
1/4 tspn sea salt
1/4 tspn ground cinnamon

Wet:
1 cup finely grated peeled D'Anjou pear (or pear sauce)
1 1/2 cups coarsely grated peeled D'Anjou pears
1/2 cup mashed banana (about 1 large banana)
1/2 cup maple syrup
2 tbsp lemon juice
1 tspn almond or vanilla extract

Topping:
1 - 2 D'Anjou pears

Preparation:
  1. Preheat oven to 350 degrees Fahrenheit and lightly grease a 9-inch spring-form pan.
  2. In a large mixing bowl, whisk together all dry ingredients until blended. In a separate bowl, whisk together all wet ingredients until blended.
  3. Peal pears for topping and cut into halves. Scoop out cores and slice halves into thin slices and set aside.
  4. Pour wet ingredients into dry and mix as briefly as possible to combine. Pour into prepared pan. Arrange pear slices as desired on top of cake and bake 45 minutes or until cake is lightly browned on top and a toothpick inserted in the center comes out clean. Remove from oven and cool on rack before removing pan.
Makes one 9-inch round cake.

Tip:
This recipe will require 5 or 6 whole pears, depending on the size of your pears - 2 for finely grating, 2 for coarsely grating, and 1 - 2 for decorating the top of your cake.

Serving Suggestion:
For an extra-special presentation, melt dark chocolate with a small amount of virgin coconut oil and drizzle back and fourth across each serving.

Recipe courtesy of Clean Start: Inspiring You to Eat Clean and Live Well by Terry Walters

USA flag United States [ print this recipe for Pear Cake ]

Book Review: Lobster for Leos, Cookies for Capricorns by Sabra Ricci

lobster for leos, cookies for capricorns"You should never judge a book by its cover." After reading the book, Lobster for Leos, Cookies for Capricorns by Sabra Ricci, I was reminded once again of the wisdom behind this age old advice. This book looks more like a paperback novel than a cookbook by a celebrity chef. And who combines astrology with cooking anyway? Sabra Ricci has done just that by drawing upon her life long interests in astrology and the culinary arts.

In this book, she has selected 8 super foods per astrological sign to support the health of the part of the body ruled by that sign. For example, the heart is ruled by Leo. In her chapter on Leos, Ricci includes recipes that feature heart healthy foods such as almonds, ahi, lobster, black beans, opakapaka, saffron, papaya, and tomatoes.

Sabra Ricci traces her love for food and astrology back to Sunday family breakfasts at her grandparents' house in Sacramento, California. Her grandfather was a big fan of the Galloping Gourmet TV program and would constantly try new dishes out for the family on Sundays. Then he would break out the Sunday paper and read everyone's horoscopes. With these early influences, Ricci went on to do extensive research in astrology and also graduated from the California Culinary Academy in San Francisco. She completed her externship at Napa Valley’s legendary Tra Vigne restaurant, working for founding chef Michael Chiarello. She then worked in Paris for Yes Catering Company whose events included parties for Michael Jackson, the Paris Polo Club and Lancôme, and lunches at the Louvre. Ricci now lives in Maui and regularly cooks for some of Hollywood's biggest celebrities. Here are some of their quotes:

"A truly talented chef and an amazing and inspiring person. So glad our planets crossed!" - Orlando Bloom

"Sabra, thank you for spoiling us. Every bite was a new experience." - Julia Roberts and her husband, Danny Moder

"Sabra is an alchemist. She cares deeply about everything she creates and lives in service to all of us - breakfast, lunch, and dinner." - Jim Carrey

As we mentioned earlier, this book does not look like a typical cookbook. There are no mouth-watering photos and the book itself is quite small. What is included, however, is a collection of over 100 easy, delicious recipes. We tried the Chicken Katsu, the Chocolate-Rum Pot de Créme, and the Wild Mushroom Risotto. Each of these recipes was easy and took very little time to prepare. The Wild Mushroom Risotto was rich and creamy and should indeed be considered "comfort food" as the author contends. The Chicken Katsu had a crispy texture on the outside and was moist and tender on the inside. The Asian inspired dipping sauce was a great combination with this dish. The Chocolate - Rum Pot de Créme was an excellent dessert combining rich chocolate with a hint of dark rum topped with whipped creme made from scratch. We give this book 5 stars out of 5. It has a solid collection of recipes that you can obtain for under 10 smackers $US.

Oregon Chocolate Stout Cake Recipe

If you're like me, there is a special place in your heart for a tall pint of Oregon stout on a winter's night. This chocolate stout cake may be the next best thing. The chocolatey flavor of stout goes naturally with the cocoa to make an outstanding cake. It tastes great with either a dusting of powdered sugar or with the vanilla - cognac icing. The choice of stout is up to you. We prefer either Obsidian Stout from the Deschutes Brewery or
Chocolate Stout from Rogue Brewery. Regardless of the brand that you choose, you won't be disappointed.

Recommended Equipment:
8 inch round non-stick cake pan

Ingredients:
cake:
10 tbsp unsalted butter
2/3 cup of stout (we recommend either Deschutes Obsidian or Rogue Chocolate Stout)
1/2 cup cocoa powder
1 1/3 cup sugar
1 1/3 cup all-purpose flour
1 tspn baking powder
1/2 tspn kosher salt
2/3 cup sour cream
1 large egg
1 egg yolk
confection sugar

icing (if you choose to use it):
2 tbsp unsalted butter
1 cup confectioner's sugar
1/4 tspn vanilla extract
1/2 tbsp cognac
milk

Preparation:
cake:
  1. Preheat the oven to 350 degrees Fahrenheit. Grease a 8 inch round cake pan.
  2. In a saucepan over medium heat, melt the butter and add the stout. Add the cocoa and whisk until smooth. Remove from the heat and let cool slightly.
  3. In a large bowl, mix together the sugar, flour, baking soda, and salt. Set aside for later.
  4. Using a mixer, beat the egg, the egg yolk, and the sour cream.
  5. Add the stout mixture to the egg mixture and mix to combine.
  6. Add the flour mixture to the mixer and mix for 1 minute at low speed. You may need to use a rubber spatula to fold in any excess flour on the sides of the mixing bowl.
  7. Pour the batter into the 8 inch baking pan. Bake for 45 to 50 minutes. It is done when a fork inserted into the top of the cake comes out clean.
  8. Let cool completely before icing or dusting with confection sugar.
icing (if you choose to use it):
  1. In a saucepan, melt the butter and cook over low heat until the butter begins to brown. Remove from the heat.
  2. Add the confection sugar, the vanilla extract, and the cognac to the saucepan and mix the ingredients until well combined.
  3. Add milk, a little at a time while whisking until the mixture reaches the proper consistency.
  4. Spread icing on the top of the cake and serve.
USA flag United States Oregon flag Oregon [ print this recipe for Chocolate Stout Cake ]

Chocolate-Rum Pot de Créme

Chocolate-Rum Pot de CrémeFrom Lobster for Leos, Cookies for Capricorns by Sabra Ricci .......

Living in the Tropics for almost twenty years, I have become a big fan of dark rum. This is a combination of two of my favorites.

Ingredients:
4 oz. bittersweet chocolate
3 cups heavy cream
1/4 cup dark rum
6 large egg yolks
3/4 cup granulated sugar
1 vanilla bean, split lengthwise, seeds scraped
1 cup heavy cream
1/4 cup brown sugar
1/2 tspn pure vanilla extract
2 oz. shaved chocolate

Preparation:
  1. Preheat the oven to 300 degrees Fahrenheit.
  2. Put the chopped chocolate in a bowl. Mix the cream, rum, vanilla seeds, and the vanilla pod in a medium heavy bottomed saucepan and place over medium heat until scalding. Pour the mixture over the chocolate in the bowl, remove the vanilla pod, and whisk the mixture until smooth.
  3. In a separate bowl, whisk together the yolks and granulated sugar.Temper the egg mixture with the warm chocolate mixture. Then return to the stove top over medium heat to thicken slightly and until it coats the back of a wooden spoon.
  4. Divide the custard equally among eight 4-ounce ramekins. Place the ramekins in a roasting pan and pour in water to come halfway up the sides of the ramekins. Bake for 40 to 45 minutes until the custards are almost set but still a bit jiggly in the center. Remove from the water bath and let cool for 30 minutes, then put in the refrigerator and chill for at least 4 hours.
  5. Just before serving, whip the cream, brown sugar, and vanilla extract until stiff peaks form. Serve the pots de créme with a dollop of whipped cream and garnish with shaved chocolate.
Serves 8

Recipe courtesy of Lobster for Leos, Cookies for Capricorns by Sabra Ricci

Jamaica [ print this recipe for Chocolate-Rum Pot de Créme ]

Açai Ice Cream Recipe

Açai Ice CreamThe first time that my wife and I tried a frozen yogurt made with Açai berries was during our honeymoon in a small town north of Rio de Janeiro called Parati. These berries are harvested in the Amazon region and taste great with yogurt, ice cream, or in juices. Like blueberries, they provide many health benefits are packed with anti-oxidants.

When we returned home, Açai berries were virtually unknown in the United States. As time passed however, Açai juice has become easier to find in markets. So we decided to try to make Açai ice cream. It turned out even better than the yogurt version that we had in Brasil. Here is the recipe.

Recommended Equipment:
ice cream maker (we used the KitchenAid Ice Cream attachment)

Ingredients:
2 cup whipping cream
2 cups half-and-half
1 1/4 cup sugar
1 vanilla bean, split lengthwise, seeds scraped
2 tbsp apricot preserves
1 10 oz. bottle Açai juice, we used Sambazon

Preparation:
  1. In a large saucepan, mix together all of the ingredients over medium heat. Stir occasionally until the mixture is scalding (but not boiling). Remove from the heat and allow to cool for about 10 minutes.
  2. Remove the vanilla bean and pour the mixture into a plastic, lidded container. Place in the refrigerator overnight.
  3. Pour the mixture into your ice cream maker and freeze it according to the instructions that came with your ice cream maker.
  4. When the mixture reaches a "soft serve" consistency, transfer the mixture back into a plastic, lidded container and place the container in the freezer to harden for at least an hour.
  5. Serve when ready.

Brazilian flag Brasil [ print this recipe for Açai Ice Cream ]

Photos from Parati....


Easy Artisan Bread Recipe

easy artisan breadIf you're looking for a recipe for fresh baked bread like you get at Panera, give this recipe a try. It works best on the weekend since the dough takes considerable time to rest. Mix the dough Friday night, rest it overnight, then bake at 3 pm on Saturday and you have a fresh loaf of artisan bread to serve with dinner. The only thing easier than this recipe is using a bread maker but the end result doesn't look anything like this. We made this last weekend and used a couple of toasted slices to make the mole in the pork tenderloin in chipotle mole recipe. We also used the warm Dutch oven with the residue from the bread to roast the tenderloin.

Recommended Equipment:
Dutch oven
Stand mixer
2 cotton kitchen towels

Ingredients:
3 cups all-purpose flour + flour for dusting
1 1/4 tspn kosher salt
1/2 tspn active dry yeast
1 5/8 cup water
Preparation:
  1. In the mixer’s bowl, add the flour, salt, and yeast. Using the hook attachment, mix the dry ingredients then slowly add the water. The dough should be sticky.
  2. Cover the mixing bowl with plastic wrap and let the dough rest for 18 hours at room temperature (between 70 and 75 degrees Fahrenheit). The dough will have small bubbles formed at the top when it is ready for the next step.
  3. Dust a counter top or other flat surface with flour. Turn the dough out of the mixing bowl onto the flour dusted surface. Sprinkle a little flour on the top of the dough. Then fold the dough once or twice upon itself. Cover it loosely with the plastic wrap and let it sit for 20 minutes.
  4. Using just enough flour to keep the dough from sticking, shape the dough into a ball with the seams facing down. Place one of the cotton towels on the counter and cover it with a thin layer of flour. Place the dough in the center of the towel. Dust the top of the dough with a thin layer of flour. Place the second towel over the dough. Let the dough rest again at room temperature (70 to 75 degrees Fahrenheit) for 2 hours. The dough should nearly double in size.
  5. A half an hour before the dough has finished resting, place a Dutch oven with lid in the center of the oven. Preheat the oven to 450 degrees Fahrenheit.
  6. When the dough has finished resting, carefully remove the hot Dutch oven from the oven and place it on the stove top. Remove the top towel from the dough. Place your hand under the bottom towel and turn the dough out into the Dutch oven so that the seams are now facing up. You may have to shake the dough a little to get it to slide to the center of the Dutch oven. Place the lid on the Dutch oven and the return it to the oven for 30 minutes. Carefully remove the lid to the Dutch oven and then bake the bread for another 15 minutes. Bread is done when it turns golden brown.
  7. Let the bread cool on a rack and then serve.

French Flag France [ print this recipe for Easy Artisan Bread ]

Book Review: The Slow Cook Book

slow cook book coverThere are a lot of slow cooker cookbooks available today but how many give you recipes for both the slow cooker version and the traditional version? The Slow Cook Book by Heather Whinney does just that and much more. Whinney is both food writer and home economist. She has written for several magazine in the UK including Prima, BBC Good Food, Family Circle and Woman and Home. She is also the author of the Illustrated Quick Cook and co-author of the Diabetes Cookbook.

The Slow Cook Book contains over 200 recipes from around the World. From Borscht to Lebanese Meatballs, this book spans the globe to feature many classic international recipes. Like the many travel guides by DK Publishing, this book is well organized, easy and fun to use. The recipes seem to be well tested and many have outstanding photographs of the end product. In addition to the recipes themselves, Heather Whinney provides some great chapters on cooking techniques including choosing ingredients, adapting recipes to a slow cooker, as well as instruction on marinating, browning, sautéing, deglazing, reducing, and many other techniques. She also includes a cool section that helps you pare different recipes to create a perfect meal.

We give The Slow Cook Book four stars out of five. We really liked the emphasis this book placed on featuring a wide variety of international recipes. Indeed, it was difficult to choose which recipes to try for our review. We ended up choosing two curries: the Sri Lankan Coconut Pumpkin Curry and the Malaysian Mango Curry. For the Sri Lankan dish, we were able to use a pumpkin that we grew in our garden. This along with the coconut was a phenomenal combination with a spicy finish from the chilies. The Malaysian curry had the sweetness from the mangoes balanced with the heat from the red chilies. The third recipe that we tried was the Asian Beef and Bok Choy. This dish featured the rich flavor of slow cooked beef with the fresh, light taste of lightly cooked bok choy. We also tried the feijoada recipe but this dish did not match up to the versions of this Brazilian classic that we were able to experience in São Paulo and Rio. But to be fare, some versions of this recipe can take up to 2 days to prepare so it would be challenging to adapt it to a slow cooker and achieve the same results.

If you had to choose one book this year for someone that is interested in learning how to cook or to just cook better, we would recommend The Slow Cook Book. It has some solid chapters on cooking techniques, many delicious, easy to prepare recipes, and great introductions to some of the World’s best dishes.

Breakfast Cinnamon Rolls Recipe

cinnamon rollI remember going to the shopping mall with all of my brothers and sisters and eating cinnamon rolls cached with vanilla icing at a restaurant chain called Cinnabon. Fortunately for my heart and waistline, I outgrew this habit. Every now and then, however, I have a breakfast craving for cinnamon rolls like the ones from the mall. You can make this dish as decadent as you want depending on how much icing (if any) you decide to use to top the rolls.

Recommended Equipment:
Stand mixer

Ingredients:
For the buns
3 1/2 cups all-purpose flour
2 tspn instant yeast
1 tspn salt
6 1/2 tbsp granulated sugar
5 1/2 tbsp shortening
1 egg, lightly beaten
1 tspn lemon extract

For the cinnamon-sugar mix
6 tbsp granulated sugar
1 tspn ground cinnamon

For the glaze
3 cups confectioners sugar
3/4 tspn lemon extract
1/3 cup warm milk

Preparation:
  1. In a stand mixer using the paddle attachment, cream the sugar, salt, and shortening together. Mix in the egg and lemon extract until smooth. Then mix in the flour, yeast, and milk until the dough forms a ball. Switch to the hook attachment and continue mixing the dough on medium for about 8 minutes. The dough should be tacky but not sticky. If it is too sticky add a little more flour.
  2. Lightly oil a large bowl. Put the dough in the bowl and roll it around to coat it with oil. Cover the bowl with plastic wrap. Let the dough sit at room temperature for about 2 hours or until the dough doubles in size.
    cinnamon roll dough
  3. In a small bowl, combine the sugar and cinnamon to make the cinnamon-sugar mix.
  4. Dust a flat surface with flour. Transfer the dough to the surface and roll it into a 14 inch x 12 inch rectangle that is about 2/3 inch in thickness. Sprinkle the cinnamon and sugar mixture evenly over the dough. Roll the dough up into a 14 inch log. With the seam side down on the counter, cut the log into 8 even pieces.
  5. Grease a large baking pan and place the rolls on the pan about ½ inch apart from one another.
    cinnamon rolls
  6. Cover the rolls with a clean towel or cloth and proof the rolls in a warm place for 1 and 1/2 hours.
    cinnamon rolls - proofed
  7. Preheat the oven to 350 degrees Fahrenheit. Bake the rolls in the middle of the oven.
  8. Bake the cinnamon rolls for 20 to 25 minutes until golden brown.
  9. After the rolls have been removed from the oven, whisk together all of the ingredients of the glaze together in a medium sized mixing bowl. Drizzle the glaze over warm rolls and serve.
German flag Germany [ print this recipe for Breakfast Cinnamon Rolls ]

Buffalo Chicken Salad Recipe

Buffalo Chicken SaladSometimes bar food can make a simple, great tasting salad. When you combine romaine lettuce and red onions with Buffalo chicken, blue cheese dressing and celery you get a winning combination. You will only need about a cup of the Buffalo chicken to make this salad so you can use all of the ingredients below along with some toasted light rye bread to make chicken salad sandwiches the following day. We usually make this dish the night after making Buffalo Chicken pizzas as it uses up all of the left over Buffalo Chicken.

Ingredients:
2 tbsp unsalted butter
3 chicken breasts
1 bottle of your favorite wing sauce. I used Kroger brand.
wing sauce
1/2 package of Hidden Valley Ranch dressing powder.
Hidden Valley Ranch Dressing
1/2 red onion
blue cheese dressing
1 rib of celery, diced
1 head of romaine lettuce, chopped

Preparation:
  1. Place the butter, chicken, Hidden Valley Ranch dressing powder, and 1/2 bottle of the wing sauce in the slow cooker. Cook on low for 6 hours.
  2. Shred the chicken and add a little more of the wing sauce to the chicken, about 2 tbsp.
  3. Place the butter, chicken, Hidden Valley Ranch dressing powder, and 1/2 bottle of the wing sauce in the slow cooker. Cook on low for 6 hours.
  4. Shred the chicken and add a little more of the wing sauce to the chicken, about 2 tbsp.
  5. Place the chopped romaine lettuce in a large salad bowl.
  6. Top the lettuce with the sliced red onion, diced celery, about 1 cup of the Buffalo chicken, and the blue cheese dressing.

USA flag United States [ print this recipe for Buffalo Chicken Salad ]

Chicken Katsu Recipe

Chicken KatsuThis is the Japanese version of your grandmother's fried chicken! You won't even miss the skin with the panko crust.

Ingredients:
Katsu Sauce
1/2 cup ketchup
2 tbsp Worcestershire sauce
2 tbsp sugar
2 tbsp tamari (soy sauce)
2 tbsp mirin
2 tbsp sake
2 garlic cloves, finely minced
2 tspn peeled, finely minced ginger
1 scallion, white part only, finely minced

Chicken
4 boneless, skinless chicken breasts, halved
1 cup all-purpose flour
Salt and freshly ground black pepper
4 large eggs
1 cup panko bread crumbs
2 cups vegetable oil

Preparation:
  1. Combine all of the ingredients for the sauce in a saucepan and bring to a boil. Reduce the heat and simmer until thickened, about 10 minutes. Remove from the heat, but keep warm.
  2. Preheat the oven to 300 degrees Fahrenheit.
  3. Place the chicken in a large ziplock bag and seal. Place the bag on a cutting board and pound with a mallet until the chicken is 1/4 inch thick.
  4. In a bowl, mix together the flour, salt, and pepper. In another bowl, beat the eggs. Put the panko crumbs in a third bowl. Dredge the chicken pieces in the seasoned flour, shaking off the excess. Dip each piece into the beaten eggs, and then dredge in the panko.
  5. Line a baking sheet with paper towels. Heat 1 cup of the vegetable oil in a heavy-bottomed pot. Add the chicken pieces, a few at a time, and cook until golden, turning once. Transfer pieces to the prepared baking sheet to drain excess oil. Spray another baking sheet with nonstick spray. Transfer chicken to the sprayed sheet and place in the oven to keep warm.
  6. Continue until all the chicken is cooked. Place the chicken on serving plates and serve with warm sauce.

Recipe courtesy of Lobster for Leos, Cookies for Capricorns by Sabra Ricci

Japanese flag Japan [ print this recipe for Chicken Katsu ]

Hungarian Bundt Cake Recipe

Hungarian Bundt Cake
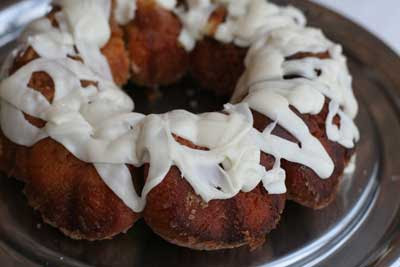
Here is another cake that uses the yellow dough recipe. It also uses the same glaze as the German Coffee Cake recipe but is denser and slightly sweeter.

Recommended Equipment:
bundt pan

Ingredients:
2 units of yellow dough
1/2 cup brown sugar
1 1/2 tbsp unsalted butter
2 tbsp shortening
1/8 tspn salt
1/2 tbsp water
1 tbsp honey
1/4 cup vegetable oil
1/4 cup unsalted butter, melted
1/2 cup granulated sugar
1 tspn cinnamon

glaze
2 tbsp butter
1 cup powdered sugar
1/2 tspn vanilla
1 tbsp milk

Preparation:
  1. If you do not have any yellow dough on hand, prepare it now.
  2. Grease the bundt pan.
  3. Using a mixer, cream together the brown sugar, unsalted butter, shortening, salt, water, and honey. Spread this mixture evenly in the bottom of the bundt pan.
  4. Divide the yellow dough evenly into eight to ten round balls.
  5. In one small bowl, mix together the vegetable oil and melted unsalted butter. In another small bowl, mix together the granulated sugar and cinnamon. Place a cooling rack on top of a baking pan.
  6. Take each ball of dough, roll it in the butter and oil mixture, and then place it on the cooling rack for 10 seconds to drain. Roll the ball in the sugar and cinnamon mixture and place it into the pan. Repeat this process for each of the balls of dough.
  7. Place the bundt pan in a warm place to proof for about an hour.
  8. Preheat the oven to 375 degrees Fahrenheit.
  9. Bake the cake for 30 minutes. Remove from oven and let cool.
  10. In a small saucepan over medium heat, whisk together all of the glaze ingredients. When the ingredients are well combined and the glaze has thickened, drizzle over the bundt cake and serve.

Hungarian flag Hungary [ print this recipe for Hungarian Bundt Cake ]

Asian Spinach with Peanut Ginger Sauce Recipe

Asian SpinachFrom Clean Start by Terry Walters...

This dish is inspired by the Japanese staple spinach gomae - spinach with sesame. Traditionally served cold in a pool of sauce, it tastes equally delicious warm. Tender baby spinach is one of the first greens to appear in the greenhouses each spring, when my mind and body are still in cooked greens mode. This recipe deliciously bridges the gap to warmer weather and more cooling preparations.


Ingredients:
8 cups firmly packed chopped fresh spinach
3 tbsp peanut butter
2 tbsp grated fresh ginger
1 tspn tamari (soy sauce)
1 tspn maple syrup
1/2 tspn toasted sesame oil or hot sesame oil
3 tbsp hot water
2 tbsp chopped roasted peanuts

Preparation:
  1. Fill large skillet or Dutch oven with 1/4 inch of water and bring to boil. Add spinach and water-sauté until just wilted. Time will vary according to maturity and variety of spinach, but expect 30 seconds to 2 minutes at most. Remove from heat and set aside.
  2. In bowl, whisk together peanut butter, ginger, tamari, maple syrup, sesame oil, and hot water. Drain spinach and squeeze to remove excess water. Place in serving dish, drizzle sauce over top, finish with chopped peanuts and serve.
Serves 4

Variations
If you're allergic to nuts, substitute sunflower butter and toasted sunflower seeds for the peanut butter and peanuts.

Recipe courtesy of Clean Start: Inspiring You to Eat Clean and Live Well by Terry Walters

Japan [ print this recipe for Asian Spinach with Peanut Ginger Sauce ]

Book Review: Blood Sugar - Inspiring Recipes For Anyone Facing the Challenge of Diabetes and Maintaining Good Health

Blood Sugar - Diabetes Recipes CoverIf you have diabetes or if you are just interested in eating good food while watching after your health, then Blood Sugar by Chef Michael Moore is for you. Moore has been a chef for 26 years and has owned and managed restaurants in both London and Sydney including The Bluebird London. He is currently the chef and owner of Summit Restaurant and Bar in Sydney. Despite being extremely active, fit, and otherwise healthy, Michael Moore was diagnosed with diabetes at the age of 35. Eight years later he suffered a stroke caused by a blood clot in the brain. Although there was no clear link between the stroke and his diabetic condition, this near death experience has caused him to be even more vigilant about what foods he eats. It also helped inspire this book which contains over 100 delicious, healthy recipes for home cooking.

In the opening chapters of Blood Sugar, Chef Moore lays out the framework he uses to categorize all foods. The categories he uses are Fire, Water, and Coal. Fire includes all highly processed, sugary, fatty, low fiber, low protein foods. Some of the foods that fall within this category include rice, white bread, pasta, potatoes, sweets, as well as many fruits and fruit juices. The body burns these foods quickly and when these foods are consumed, they immediately elevate blood sugar levels. His Water category includes most vegetables except for pumpkins, potatoes, and parsnips. These foods are high in fiber and have minimal effect on blood sugar levels. The third category is Coal and includes foods that are high in fiber and high in protein. The body burns these foods slowly. Some of the foods in this category include nuts and seeds such as walnuts, almonds, pecans, pumpkin seeds, and sunflower seeds. Lean meats, fish, lentils, chickpeas, and beans are also included.
Chef Michael Moore
Diabetics rate foods according to their Glycemic Index which designates the impact that the particular food has on blood sugar (ie. Glucose) levels. Foods in the Fire category tend to elevate blood sugar levels and should be eaten in moderation. A healthy diet should rely heavily on foods in the water and coal categories as they help maintain sustained energy and promote the stability of blood sugar levels. Proper diet based on this framework combined with at least 20 minutes of exercise daily should lead to better overall health.

In our review, we tested 3 recipes from the book. The first recipe, Banana and Berry Iced Smoothie, was delicious and refreshing. It would be ideal for a spring or summer brunch. Be sure to prepare it two hours before guests arrive as it requires time to freeze to the proper consistency. The second recipe that we tried was the Power Food Salad which we found to be a nice combination of flavors, colors, and textures. It is a great tasting salad that would pair well with grilled meats or vegetables at a cookout. The third recipe in our review was the Baked Chocolate and Orange Pudding. This is a great tasting, healthy chocolate dessert with a hint of citrus flavor. It is amazing how good it tastes while having low sugar content. For its sweetness, the recipe relies on agave nectar, a natural sweetener that has a low glycemic index due to its slow rate of absorption into the bloodstream.

We give the book, Blood Sugar by Michael Moore, four stars out of five. The book provides a lot of useful information for diabetics and non-diabetics alike about eating better foods. All of the recipes that we tried were outstanding. The book is filled with delicious, healthy recipes that are accompanied by beautiful photographs of the dishes to match. With the projected growth of diabetes around the world, Michael Moore’s latest book will likely become a valuable resource to many families in the future.

Baked Chocolate and Orange Pudding Recipe

baked chocolate and orange puddingThis is really quick to make. Everyone loves this one!

Ingredients:
600 ml (20 fl oz) low-fat milk
zest of 1 orange
1 tspn vanilla extract
90 g (3 oz) agave syrup
2 tbsn cocoa powder, sifted
2 eggs
2 tbsp butter
3 thick slices seeded brown bread
cocoa and icing sugar, for dusting
sugar-free ice cream, to serve

Preparation:
  1. Preheat oven to 180 degrees Celsius (350 degrees Fahrenheit).
  2. Bring milk to the boil in a saucepan with orange zest, vanilla and agave syrup. Remove from heat and cool slightly.
  3. Mix cocoa to a paste in a cup with a spoon of cold milk, then whisk into the hot milk. Lightly whisk the eggs in a bowl. Pour the hot milk mixture over the top (ensure the milk is not boiling). Continue to stir.
  4. Spread butter onto the slices of bread and arrange in a small baking dish. Pour the chocolate custard mixture evenly over the top. Allow to stand for 15 minutes to allow bread to absorb custard.
  5. Bake in oven for 35 minutes. Dust with a little cocoa and icing sugar. Serve warm with some light or sugar-free ice cream.
Serves 6

Recipe courtesy of Blood Sugar: Inspiring Recipes For Anyone Facing The Challenge of Diabetes and Maintaining Good Health by Michael Moore.

Australia flag Australia [ print this recipe for Baked Chocolate and Orange Pudding ]
Related Posts Plugin for WordPress, Blogger...