HOME ABOUT REVIEWS INTERVIEWS SUBSCRIBE CONTACT FACEBOOK TWITTER

Jalapeno Corn Muffin Recipe

jalapeno corn muffins
This recipe for jalapeno corn muffins is another favorite dish on Mardi Gras (Fat Tuesday). They are a perfect complement to chicken gumbo or other types of soup. These jalapeno corn muffins are rich and spicy with a hint of salt.

The first time that we tried jalapeno corn muffins was at the restaurant Heaven on Seven in Chicago. We soon became regulars of this establishment and would have these for lunch along with a cup of their famous gumbo not only during the week of Mardi Gras but every week! If you're ever in Chicago, you should definitely pay Heaven on Seven a visit.

Recommended Equipment:
2 12 count muffin pans

Ingredients:
4 eggs
2 cups buttermilk
1/2 cup unsalted butter, melted
2 cups all-purpose flour
2 cups yellow cornmeal
1 tspn baking soda
4 tspn baking powder
2 tspn kosher salt
5 tbsp sugar
8 oz. cheddar cheese, shredded
1/3 cup corn kernels, frozen
3 - 4 jalapeno peppers, minced

Preparation:
  1. Preheat oven to 400 degrees Fahrenheit.
  2. Grease 2 12 count muffin pans (total of 24 muffins).
  3. In a large mixing bowl, mix together the eggs, melted butter, and buttermilk.
  4. In a separate mixing bowl, mix together the flour, cornmeal, baking soda, baking powder, salt, and sugar.
  5. Add the corn, jalapenos and shredded cheddar cheese to the bowl containing the dry ingredients. Mix so that the corn, jalapenos and cheese gets coated with the dry mixture.
  6. Add the bowl containing the egg, milk, and butter mixture to the dry mixture. Mix together so that all of the ingredients are distributed evenly. Try not to over-mix the batter.
  7. Divide the batter evenly to make a total of 24 muffins. Each cup should be roughly 2/3 full.
  8. Bake for about 20 minutes. Muffins are done when you can insert a fork into the muffin and it comes out clean.
USA flag United States Louisiana flag Louisiana [ print this recipe for Jalapeno Corn Muffins ]

St. Charles Street Chicken Gumbo Recipe

st. charles st. gumbo
About four years ago, I realized that we didn't have a good recipe for chicken gumbo. So I found 4 or 5 recipes and combined parts from each of them to make the one that I'm listing in this post. Since then, my family and I have been kicking off Fat Tuesday with a huge pot of this chicken gumbo.

I wanted it to try to replicate the taste of the gumbo served at Heaven on Seven, a great Cajun restaurant located on Wabash Street in Chicago. Although this recipe is not quite as good as the Heaven on Seven version, it does come close.

Preparing chicken gumbo is a little labor intensive since we are making the chicken stock from scratch. It will take a couple of hours from start to finish. But hopefully it will be worth the effort. Just put on a Clifton Chenier CD and be patient. There is nothing better than a hearty dish like this in early March!!

Recommended Equipment:
Large, deep stockpot
Cast iron skillet

Ingredients:

1 whole chicken cut into major parts (wings, thighs, breasts, etc.) - do not remove the skin
2 carrots, diced
2 ribs of celery, diced
1 handful of parsley, finely chopped
2 medium yellow onions, diced
1 bay leaf
1 cup of white wine
10 pepper corns
1 tspn kosher salt
1 tspn black pepper
2 tbsp extra virgin olive oil
3 cups of okra, sliced into wheels
okra
3 tbsp unsalted butter
3 tbsp all-purpose flour
2 medium yellow onions, diced
3 tbsp unsalted butter
3 tbsp all-purpose flour
1 green bell pepper, diced
3 ribs of celery, diced
7 cloves of garlic, diced
1 package of andoullie sausage (about a pound), cut into thin wheels
3 Roma tomatoes, diced
2 tspn basil
2 tspn cayenne pepper
2 tspn thyme
Tobasco sauce
salt and pepper to taste

Preparation:
  1. Add chicken, carrots, parsley, onion, bay leaf, celery, white wine, pepper corns, kosher salt, and black pepper to the pot and cover with water (about 10 cups of water).
  2. Bring the mixture to a boil over medium heat then reduce to low and simmer for 2 hours.
  3. Using tongs, remove the chicken from the pot and let it cool on a cutting board. When the chicken has cooled, remove the skin and place it in a medium sized pot. Remove the chicken meat from the bones and place it in a bowl and set aside. Place the bones in the pot with the skin. Cover the skin and bones with water and then place the pot over low heat for at least 1 hour.
  4. Pour the remaining contents of the large stock pot through a strainer into another large pot or bowl. This is the chicken stock that you will use for the gumbo. Discard the spent vegetables and small pieces of chicken that were caught in the strainer.
  5. Pour the chicken stock back into the large stock pot. After the pot with the chicken bones has simmered for at least an hour, strain it into a bowl, discard the bones and skin, and then add this chicken stock to the stock pot as well.
  6. Heat 2 tablespoons of olive oil in a cast iron skillet over medium heat. Add the okra to the skillet and cook for about 20 minutes. Remove the okra from the skillet and reserve for later. Do not clean the skillet.
  7. Add 3 tablespoons each of butter and all-purpose flour to the skillet over medium heat. Whisk the butter and flour constantly for about 15 to 20 minutes until they form a roux that is the color of peanut butter.
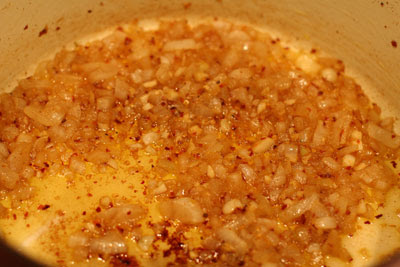
  8. Add the diced onions to the roux and cook until the onions have softened and become translucent. Add the onions and the roux to the stock pot. Do not clean the skillet.
  9. Add 3 tablespoons each of butter and all-purpose flour to the skillet over medium heat. Whisk the butter and flour constantly for about 15 to 20 minutes until they form a roux that is the color of peanut butter.
  10. Add the diced garlic, green pepper, and celery to the roux and cook until the vegetables have softened. Add the vegetables and the roux to the stock pot.
  11. Add the chicken, okra, tomatoes, andoullie sausage, basil, cayenne pepper, and thyme.
  12. Partially cover the pot and simmer for at least 2 more hours.
  13. Season with Tobasco sauce, salt, and pepper to taste.
USA Flag United States Louisiana Flag Louisiana [ print this recipe for St. Charles Street Gumbo ]

Halushki Recipe

halushki with bacon

Halushki is a simple Polish recipe that is easy and inexpensive to make. There are basically three separate components that are combined during the final assembly of the dish: a spicy onion and garlic sauce, egg noodles, and cabbage.

Halushki is a hearty dish with a subtle, spicy flavor from the olive oil infused with crushed red pepper. It's a great choice if you want to feed alot of people at a low cost.

This Halushki recipe serves 4 to 6 people.

Ingredients:

1 head of cabbage
8oz. of egg noodles (1/2 of 1 pound bag)
1 large yellow onion, diced
4 tbsp butter
3 tbsp extra virgin olive oil
4 cloves garlic, diced
1 tspn brown sugar
1/2 package of turkey bacon, chopped
1 tbsp red pepper flakes
salt and pepper

Preparation:
  1. Cook turkey bacon in a skillet over medium heat until crisp. Set aside on a paper towel leaving a small amount of fat in the skillet.
  2. Add butter and olive oil to the skillet over medium heat.
  3. Add the red pepper flakes and the diced onion. Cook until onion changes color and becomes translucent.
    onions and garlic
  4. Add the garlic, brown sugar, salt and pepper (to taste) to the skillet. After about 3 minutes, remove the skillet from the heat and set aside.
  5. In a separate pot, add about 1/2 to 3/4 inch of water along with the cabbage. Put a lid on the pot and lightly steam the cabbage. Be careful to not overcook. Cabbage should be tender but crisp. Strain the cabbage and set aside.
    Cabbage
  6. In a separate pot, boil the egg noodles for 5-6 minutes until al dente. Be careful not to over cook. Strain the noodles and set aside.
  7. In a large serving bowl, add the noodles, then stir in the onion and oil mixture so that the noodles are coated.
  8. Add the cabbage and stir into the noodle mixture.
  9. Add the crispy bacon and stir all of the contents of the bowl together so that they are well integrated. Serve hot.
Polish Flag Poland [ print this recipe for Halushki ]

Cioppino Recipe

cioppino
Cioppino is a rich, red, seafood-based soup that was developed in the early 1800s by Portuguese and Italian fishermen that settled along the Northern California coast around San Francisco.  It was first prepared on their fishing vessels from leftover pieces of fish, clams, mussels, and dungeness crabs.  Cioppino, which has many similarities to other mediterranean fish dishes such as bouillabaise, grew in popularity in the Bay Area and has been on the menus of many of San Francisco's restaurants ever since.  It is a great winter-time dish and is best served with toasted sour dough bread and a Oregon Pinot Noir.  If sour dough bread is unavailable, you can make yourself a loaf of Easy Artisan Bread which will work just as well.

Ingredients:
1/4 cup extra-virgin olive oil
1 tbsp crushed red pepper flakes
3 - 4 flat anchovie fillets
6 cloves garlic, minced
1 bay leaf
1 large yellow onion, diced
1 cup California Chardonnay
1 1/2 cups chicken stock
32 oz. crushed red tomatoes
1 cup clam juice
1 tbsp thyme
1 tspn oregano
1 tspn basil
1 hand full of finely chopped flat-leaf parsley
salt and ground black pepper, to taste
1 1/2 pounds cod or other white fish, cut into 2 inch chunks
8 large shrimp
16 mussels or clams
1 can of lump crab meat or fresh crabs (if you can get them) - Dungeness crabs are the best with this but they are usually only available on the US west coast.  Blue crabs would also work with this recipe for cioppino.

+ sour dough bread or Easy Artisan Bread.

Preparation:
  1. In a large pot over medium heat, combine the olive oil, red pepper flakes, anchovies, garlic, and the bay leaf.
  2. As  the anchovies begin to disintegrate, add the diced yellow onion and cook the onion for a few minutes until it becomes translucent in color.
  3. Add 1 cup of chardonnay and continue to cook for a few minutes to allow the wine to reduce.
  4. Add the chicken stock, crushed red tomatoes, clam juice, thyme, oregano, basil, parsley, salt, and pepper.  Bring the soup to a boil then reduce the heat to a simmer.  Let the soup simmer for an hour.
  5. Season the white fish on both sides with salt and pepper.  Set aside while the soup simmers.
  6. After an hour has passed, add the shrimp, mussels or clams, crab meat, and pieces of white fish to the cioppino.  Do not stir the mixture so that the pieces of white fish do not break apart.  Let the cioppino simmer for another hour to allow all of the flavors to meld.
  7. Serve cioppino hot with slices of toasted bread and red wine (Oregon Pinot Noir or this Pinot Noir one from Chile if you can find it).
USA Flag United States  [ print this recipe for Cioppino ]

Book Review: The Meatloaf Bakery Cookbook

Ever been to Chicago in January?  If the answer is yes, then you realize why comfort food is so popular in this city.  It's also easy to understand why restaurants such as the Meatloaf Bakery have become Second City favorites!  This Lincoln Park establishment was founded by Cynthia Kallile in December of 2008.  After a successful 25 year career as a corporate PR exec, Kallile decided to venture into the restaurant business.  Building on the early success of her imaginative meatloaf creations, she and her team at the Meatloaf Bakery have grown the business to also include a food truck, the Meatloaf A-Go-Go and also a catering business.  She recently released The Meatloaf Bakery Cookbook - Comfort Food with a Twist and the International Recipe Syndicate had the opportunity to try some of her recipes.

The book begins with a chapter on "making the loaf" where the author recommends the classic meat mix of 80% to 85% lean ground beef complemented by ground pork and/or ground veal.  She also recommends using filler of bread crumbs, crushed butter crackers, or even oyster crackers.  These, along with the key ingredients of parsley, basil, thyme, lemon, and garlic make a solid base that can be used to build a myriad of meatloaf creations.  If you are a vegetarian, don't dismay.  The Meatloaf Bakery Cookbook also includes chapters on meatless loaves and "lite bites" that feature vegetarian specialties, salads, side dishes, and appetizers.


For our review, we chose the Father Loaf, one of the Meatloaf Bakery's classic dishes.  We also tried the Cheesy Taters as they were needed for the garnish of the Father Loaf.  We found the cheesy taters to be smooth and packed with cheddar cheese flavor - a welcome change from plain mashed potatoes.  This dish could stand on its own as a side for any meal.  But when you combine it with the Father Loaf, you have one of the best comfort food combinations around!  The father Loaf itself is HUGE covering a good portion of an entire baking pan.  We thought we would be eating leftovers for a week but when all was said and done it was gone in a single day.  This version of the classic meatloaf had an unbeatable combination of flavors complemented perfectly by a barbecue glaze.  We only tried one meatloaf recipe from the Meatloaf Bakery Cookbook but there were many other recipes that tempted us.  I'm sure we will be trying many other recipes for meatloaves and sauces in the near future.  We give the Meatloaf Bakery Cookbook 4 out of 5 stars.

Acarajé Recipe

acaraje
The first time that I tried acarajé was at the airport in Salvador, Bahia (located on Brazil's central coast region). 3 ladies wearing traditional Bahian attire (see below) were sitting just outside of the terminal in a make-shift kitchen consisting of a couple of large metal pots, a butane burner and a few coolers. They recommended their acarajé, a specialty of the region. These deep-fried cakes consisting of mashed beans, shrimp, and spices were so good that I found myself ordering them throughout my stay in Salvador. This is a simple recipe. You can form acarajé as cakes or balls depending on your preferred serving size.

bahia - acaraje vendor

Recommended Equipment:
food processor or blender

Ingredients:
1 15oz. can navy beans, drained
1/2 yellow onion, diced
1 Serrano pepper, diced
1 cup of fresh shrimp, chopped
1/2 tspn salt
1/2 tspn black pepper
3 tbsp manioc or tapioca flour
oil for frying

dipping sauce:
3 tbsp olive oil
3 shrimp. finely diced
1/2 yellow onion, finely diced
2 to 3 dried hot peppers
3 tbsp dendê oil (palm oil)
1/4 tspn salt

Preparation:
  1. Place the beans, onion, Serrano pepper and shrimp into a food processor and pulse to form a smooth paste.
  2. Add salt, pepper, and flour and mix the ingredients until they are well combined.
  3. In a medium saucepan, heat the oil for deep frying.
  4. While the oil heats up, form the acarajé using your hands. You can form them as balls or paddies - it's up to you. You can even garnish them with small dried shrimp pressed into the pattie if you prefer.
  5. Serve hot with dipping sauce.
dipping sauce:
  1. In a skillet, heat the olive oil over medium heat.
  2. Add the shrimp, onions, and hot peppers.
  3. When the onions become clear and translucent, add the dendê oil and salt to the skillet and reduce the heat to simmer.
  4. Serve when all of the acarajé are ready.
Brazilian flag Brasil [ print this recipe ]

The Homer Simpson: Pink-Sprinkle Mini Donut Recipe

Homer Simpson Pink-Sprinkle Donuts
"'Dear Homer, IOU one emergency donut. Signed, Homer.' Bastard! He's always one step ahead." - Homer Simpson. Homer has always known the importance of a good donut, and now that you're making a mini version of his favorite, there'll be plenty to go around!


Recommended Equipment:
Donut pan(s) or electric donut maker

Ingredients:
For Donuts
1 1/3 cups all-purpose flour, sifted
2 tspn baking powder
1/4 tspn salt
1 large egg
1/2 cup granulated sugar
3/4 cup whole milk
3 tbsp vegetable oil
2 tspn vanilla extract

For Icing
1 tbsp whole milk
1 tspn vanilla extract
1 1/2 cups powdered sugar
2-3 drops red food coloring

For Topping
2 ounces multicolored sprinkles

Preparation:
  1. If using an electric donut maker, preheat according to manufacturer's instructions.  If using donut pans, preheat oven to 350 degrees Fahrenheit and grease donut pans.
  2. In a small bowl, sift together flour, baking powder, and salt.  Set aside.
  3. In a medium bowl, whisk together egg and sugar.  Then add milk, oil, and vanilla extract, mixing until thoroughly combined.  Gently stir in the flour mixture, stirring until there are no lumps.If using mini-donut pans:  Carefully fill each donut indentation 3/4 full.  Bake for 7-9 minutes or until a toothpick inserted into a donut comes out clean.  Transfer donuts to a cooling rack and cool completely.  If using an electric mini-donut maker:  Carefully fill each donut indentation 3/4 full.  Bake according to manufacturer's instructions or until a toothpick inserted into a donut comes out clean.  Remove donuts from appliance, transfer to a cooling rack, and let cool completely.
  4. Place wax paper under a wire rack to collect any drippings for an easy cleanup.  Then, in a small bowl, whisk together milk and vanilla extract.  Add powdered sugar, whisking until smooth.  Add red food coloring    1 drop at a time, until you reach the desired pink color.
  5. Dip the top of each donut into the icing and transfer to a wire rack.  Immediately garnish the tops with the multicolored sprinkles and let set for 5 minutes.  Donuts can be stored in an airtight container for up to 3 days but are best served fresh.
Recipe courtesy of Mini Donuts by Jessica Segarra
 
USA Flag United States  [ print this recipe for The Homer Simpson: Pink-Sprinkle Mini Donut ]
Related Posts Plugin for WordPress, Blogger...