HOME ABOUT REVIEWS INTERVIEWS SUBSCRIBE CONTACT FACEBOOK TWITTER

Book Review: Artisan Pizza and Flatbread in Five Minutes a Day

Artisan PizzaDo you like pizza? For most of us the answer is a resounding yes!! The third book by Jeff Hertzberg, M.D. and Zoë François, Artisan Pizza and Flatbread in Five Minutes a Day, provide a wealth of information on how to prepare this world famous dish in your own kitchen in minutes. The key to doing this, the authors contend, is by mixing enough dough for many pizzas or flatbreads in advance and then storing it in the refrigerator or freezer. With a ready supply of dough already prepared, anyone can make a wide range of pizzas or flatbreads in 30 minutes.

The book includes an extensive discussion of ingredients including different types of flours, tomato sauces, cheeses, meats, seafood, eggs, yeast, oils, and sweeteners. The authors also discuss the four pieces of equipment that you will need (a baking stone, cast-iron pan, or perforated pizza pan, a pizza peel, an oven thermometer, and a dough scraper) to make pizza plus other, optional items that can make the job easier. A chapter devoted to helpful hints and frequently asked questions is also included that draws upon feedback that Hertzberg and François received about their earlier two books, Artisan Bread in 5 Minutes a Day and Healthy Bread in 5 Minutes a Day. After this valuable introduction to the basics of pizza making, the authors walk you through the process of making the book’s master recipe, Classic Pizza Margherita. By preparing this basic dish, the reader learns the key steps necessary to prepare any of the later recipes in the book. Artisan Pizza and Flatbread in Five Minutes a Day includes over 100 different recipes for pizza and flatbread, as well as sauces, dips, and even desserts.

In our review, we tried two different types of dough, the Savory Brioche and the “Crisp-yet-tender Pizza Dough (Naples Style).” Using this dough, we made the Balthazar Goat Cheese and Onion Pizzette, the Turkish Spiced Flatbread (Lahmacun), and the Individual Breakfast Pizza in a Cup. We wanted to make the recipes during the week, so we decided to mix up the two different types of dough on Sunday using a standard Kitchen Aid stand mixer. We then stored the dough in the refrigerator to use as needed during the week. On Monday, we wanted to try the Balthazar Goat Cheese Pizzette so we used some of the Savory Brioche dough. While the oven heated up to 475 degrees Fahrenheit, the dough warmed up to room temperature, and we prepped all of the toppings. With baking time only 8 minutes, we were indeed able to prepare a restaurant grade pizza dish in about half an hour. The next morning, we tried the breakfast pizza in a cup again using more of the Savory Brioche. This dish was easy to prepare and would be ideal for serving to guests at a weekend brunch since it takes very little time to make using ingredients made in advance.

The book includes a short interview with the authors in which Zoë François was asked to name her favorite recipe. Her response: the Turkish Spiced Lamb Flatbread. So we had to try this recipe too. For this recipe we used the Crisp-yet-tender pizza dough with seasoned ground lamb, onion, parsley, lemon and tomato. We could see why this recipe was the author’s favorite. It had a great combination of rich flavors accented with the fresh acidity of the tomatoes and lemon. This is also another good recipe for entertaining or an easy meal during the week as the spiced lamb can be prepared and refrigerated up to 3 days in advance.

Overall, this is an outstanding book for working parents that are interested in serving healthier meals to their families during the week. It provides a system that, with a little planning, can be used to create healthy, delicious dishes from scratch in less than an hour. We give this book four out of five stars.

Breakfast Pizzas in a Cup Recipe

bacon and egg pizza cupTake the ever-loved breakfast combo of bacon and eggs, bake them on a crisp pizza crust, and you have an exciting twist on tradition. Shake it up a bit with sausage, Canadian bacon, or even huevos rancheros toppings. These pizzas are a quick, easy, and fun way to eat a traditional breakfast.

To create a more festive breakfast treat try baking the individual pizzas in muffin pans.

Ingredients:
1 pound (grapefruit-size portion) lean or gluten-free dough or Savory Brioche dough.
6 strips of bacon (or breakfast sausage or Canadian bacon)
6 oz. of cheddar cheese (or your favorite), shredded
6 large eggs
salt and freshly ground pepper to taste
butter or oil for greasing the pans

Preparation:
  1. Prepare and measure all toppings in advance. Render the bacon, sausage, or Canadian bacon, break it up into pieces and set aside.
  2. Preheat the oven to 475 degrees Fahrenheit, with the racks in the center and top third of the oven. Grease two baking sheets. Dust the surface of the refrigerated dough with flour and cut off a 1-pound (grapefruit-size) piece. Dust with more flour and quickly shape it into a ball by stretching the surface of the dough around to the bottom on all four sides, rotating the ball a quarter-turn as you go. Divide the dough into 6 equal portions and form them into balls.
  3. Roll out and stretch the crusts: Flatten each piece of dough with your hands and/or rolling pin on a work surface to produce a 1/8-inch-thick round. Dust with flour to keep the dough from adhering to the surface. Use a dough scraper to unstick the dough as needed. Transfer to the prepared muffin pan.
  4. Grease the pans and lay the dough into the wells.
  5. Layer the ingredients into the dough cups, crack the egg over the top of each. Don't overfill these, or the contents will spill out of the cups.
  6. Place the muffin pan in the preheated oven. Check for doneness in 5 to 8 minutes, at this time, turn the pan around in the oven if one side of the pizzas is browning faster than the other. It may take up to 5 minutes more in the oven.
  7. Serve hot from the oven.
Makes six 4-inch pizzas

Recipe courtesy of Artisan Pizza and Flatbread in Five Minutes a Day by Jeff Hertzberg and Zoë François

USA flag United States [ print this recipe for Breakfast Pizzas in a Cup ]

Hearty Slow Cooker Carbonnade Recipe

carbonnadeOn a cold winter day, there is nothing more satisfying than the aroma of a hearty beef stew bubbling away. This classic Belgian dish, cooked in beer, is one of the best. Serve with mashed potatoes or hot buttered noodles and plenty of bread to soak up the luscious sauce.

Recommended Equipment:
medium to large (3 1/2 to 5 quart) slow cooker

Ingredients:
1 tbsp oil
4 oz. chunk of bacon or salt pork belly, cut into 1/4-inch (0.5 cm) dice
2 pounds stewing beef, cut into 1-inch(2.5 cm) cubes, and patted dry
4 onions, thinly sliced
1 tbsp granulated sugar
4 cloves garlic, minced
3 tspn dried thyme
1 bay leaf
1 tspn salt
1 tspn cracked black peppercorns
1/4 cup all-purpose flour
2 cups flat beer

Preparation:
  1. In a skillet, heat oil over medium-high heat. Add bacon and cook until crisp. Using a slotted spoon, transfer to paper towel to drain. Set aside.
  2. Add beef to skillet, in batches, and brown, about 4 minutes per batch. Using a slotted spoon, transfer to slow cooker.
  3. Reduce heat to medium. Add the onions to pan and cook, stirring, until softened, about 3 minutes. Add sugar and continue to cook and stir until onions begin to caramelize, about 10 minutes. Add garlic, thyme, bay leaf, salt, and peppercorns and cook, stirring, for 1 minute. Add flour and cook, stirring, for 1 minute. Add reserved bacon and beer and cook, stirring and scraping up brown bits from bottom of pan, until slightly thickened, about 2 minutes.
  4. Pour mixture over beef (in the slow cooker). Cover and cook on low for 8 hours or on high for 4 hours, until meat is tender. Discard bay leaf. Serve immediately.
Serves 6

Recipe courtesy of The 150 Best Slow Cooker Recipes by Judith Finlayson

Belgian flag Belgium [ print this recipe for Hearty Carbonnade ]

Lamb Korma with Spinach Recipe

lamb kormaA korma is an Indian dish of meat or vegetables braised in a minimal amount of liquid. This version, although very simple, is delicious and benefits from the addition of spinach and yogurt to enrich the sauce. Serve with fluffy rice, preferably basmati, a steamed vegetable and Indian bread.

Recommended Equipment:
large (approximately 5 quart) slow cooker

Ingredients:
2 tbsp oil
2 pounds boneless lamb shoulder roast, trimmed, cut into 1-inch (2.5 cm)cubes, and patted dry
2 onions, finely chopped
4 cloves garlic, minced
2 tbsp minced ginger root
4 cardamom pods, split
1 tbsp ground turmeric
1 tbsp mustard seeds
1 tspn salt
1/2 tspn cracked black peppercorns
1/4 cup water
1 to 2 long red or green chiles, minced
1 pound fresh spinach, stems removed, or 1 package (10 oz./300 g) spinach, washed, and finely chopped
1/2 cup yogurt
hot cooked rice

Preparation:
  1. In a skillet, heat oil over medium-high heat. Add lamb, in batches, and brown, about 4 minutes per batch. Using a slotted spoon, transfer to slow cooker stoneware.
  2. Reduce heat to medium. Add onions and cook, stirring, until softened, about 3 minutes. Add garlic, ginger, cardamom pods, turmeric, mustard seeds, salt, and peppercorns. Cook, stirring, for 1 minute. Add water and stir.
  3. Transfer mixture to slow cooker stoneware and stir well. Cover and cook on low for 7 to 8 hours or on high for 3 to 4 hours, until lamb is tender.
  4. Stir in chile pepper to taste. Add spinach and stir well, pushing the leaves down into the hot stew. Cover and cook on high for 20 minutes or until spinach is soft. Stir in yogurt and serve over hot cooked rice.
Variation:
Beef Korma with spinach: substitute 2 pounds (1 kg) stewing beef for the lamb.

Serves 6 to 8

Recipe courtesy of The 150 Best Slow Cooker Recipes by Judith Finlayson

Indian flag India [ print this recipe for Lamb Korma with Spinach ]

Turkish Spiced Lamb Flatbread ( Lahmacun ) Recipe

turkish spiced lamb flatbreadFrom Artisan Pizza and Flatbread in Five Minutes a Day, by Jeff Hertzberg and Zoë François.....

My friend Serap is a native of Istanbul and now owns Depot 62, a Turkish restaurant in Manchester, Vermont. She introduced my family to this richly spiced lamb-covered flatbread. When it came to the table. she sprinkled it with fresh parsley, squeezed a lemon over the top, and then rolled it up like a crepe. Of all the delicious foods she presented to us this was the most loved - Zoë

Makes one 10-inch flatbread (makes enough lamb for 4 flatbreads)

Ingredients:
1/4 pound (peach-size portion) lean or gluten-free dough
2 tbsp olive oil
1/2 yellow or white onion, finely chopped
1 1/2 tspn ground cumin
1 1/2 tspn ground coriander
1 tspn paprika
1 pound ground lamb
1 tbsp tomato paste
1 tspn salt
2 tbsp finely chopped flat-leaf parsley
flour for the pizza peel

Toppings:
1/4 cup flat-leaf parsley
1/4 cup chopped yellow or white onions
1/4 cup chopped tomatoes
1 lemon, cut into quarters

Preparation:
  1. Prepare the spicy lamb: Place a skillet over medium heat and add the olive oil and chopped onion. Cook, stirring, until the onion is soft but not brown. Add the spices and cook for a minute, then add the ground lamb. Cook the lamb until it is evenly browned, breaking it up as it browns. Stir in the tomato paste, salt, and parsley. Set aside to cool before topping the flatbread. The lamb can be made in advance and stored in the refrigerator for 3 days.
  2. Preheat a baking stone to 500 degrees Fahrenheit for at least 30 minutes. Sprinkle a pizza peel liberally with flour. Dust the surface of the refrigerated dough with flour and cut off a 1/4 pound (peach-sized) piece. Dust with more flour and quickly shape it into a ball stretching the surface of the dough around to the bottom on all four sides, rotating the ball a quarter-turn as you go.
  3. Stretch the flatbread: Flatten the dough with your hands and/or a rolling pin on a work surface, or directly onto the wooden pizza peel, to produce a 1/16-inch-thick round (about 10 inches across). Dust with flour to keep the dough from adhering to the surface. Use a dough scraper to unstick the dough as needed, and transfer to a pizza peel if you haven't already stretched the dough on one. When you are finished, the dough round should have enough flour under it to move easily when you shake the peel.
  4. Add the meat: Spread 1/3 cup of the meat evenly over the disk of dough. Save the remaining meat for more pizzas or freeze.
  5. Slide the flatbread onto the preheated stone. If you're using a sheet pan, place it right on the stone. Check for doneness in 5 to 8 minutes, the crust should be baked through but remain pale and soft.
  6. Serve immediately with chopped parsley, onions, tomatoes, and a squeeze of fresh lemon. Cut into slices or roll up the flatbread like a crepe and enjoy!
Recipe courtesy of Artisan Pizza and Flatbread in Five Minutes a Day by Jeff Hertzberg and Zoë François

Turkey [ print this recipe for Turkish Spiced Lamb Flatbread (Lahmacun) ]

Balthazar Goat Cheese and Onion Pizzette (Little Pizza-Tarts) Recipe

Goat cheese and onion pizzetteFrom Artisan Pizza and Flatbread in Five Minutes a Day, by Jeff Hertzberg and Zoë François.....

These pizzettes were inspired by a savory tart that my cousin, chef Riad Nasr, serves at Balthazar in New York City. It is a mix of quintessentially French bistro flavors: caramelized onions, goat cheese, and thyme. They go well with many of our crusts but my two favorites are the Cornmeal Olive Oil and the Savory Brioche dough. - Zoë

Makes six 4-inch pizzettes

Ingredients:
1 pound of (grapefruit-size) lean or gluten-free dough or Savory Brioche dough
2 tbsp olive oil
2 medium yellow onions, peeled, cut into 1/8-inch-thick slices
1 bay leaf
2 tspn fresh thyme (or 1 tspn dried)
salt and freshly ground black pepper to taste
4 oz. soft chévre (goat cheese), at room temperature
4 oz. cream cheese, at room temperature
1 egg yolk

Preparation:
  1. In a skillet over medium-low heat, add the olive oil, onions, bay leaf, thyme, salt, and pepper. Cook slowly, stirring occasionally, until the onion are golden. This may take 20 to 30 minutes. If the pan gets too dry, add some water to the onions, 2 tbsp at a time.
  2. In a small bowl mix together the cheeses and the egg yolk until smooth. Set aside.
  3. Preheat the oven to 475 degrees Fahrenheit, with the racks in the center and top third of the oven. Grease two baking sheets. Dust the surface of the refrigerated dough with flour and cut off a 1-pound (grapefruit-size) piece. Dust with more flour and quickly shape it into a ball by stretching the surface of the dough around to the bottom on all four sides, rotating the ball a quarter-turn as you go. Divide the dough into 6 equal portions and form into balls.
  4. Stretch the pizzette crusts: Flatten each piece of dough with your hands and/or a rolling pin on a work surface (or shape the disk by hand) to produce a 1/8-inch-thick round. Dust with flour to keep the dough from adhering to the surface. Use a dough scraper to unstick the dough as needed, and transfer to the prepared baking sheets.
  5. Add the toppings: Distribute the goat cheese mixture equally among the 6 dough rounds, spreading evenly, then add the onions.
  6. Place the baking sheets in the preheated oven. Check for doneness in 10 minutes; at this time, turn the baking sheets around in the oven if one side of the pizzettes is browning faster than the other and switch the pans from the top and the bottom rack. It may take up to 5 minutes more in the oven.
  7. Allow to cool, preferably on a wire cooling rack. Serve warm, not hot.
VARIATION: Caramelized Onions, Sautéed Potatoes, and Fresh Pecorino
Add 2 tbsp of wine to the onion mixture while caramelizing. Once the onions are cooked, remove them from the pan and set aside. Add 1 tbsp olive oil to the same pan and sauté 1 thinly sliced potato for about 3 minutes, just to soften. Replace the cheese mixture with 3 ounces of grated pecorino cheese (or any other hard grating cheese). Roll out the pizzettes and distribute the toppings evenly over them, and sprinkle with salt and pepper. Bake as above.

Recipe courtesy of Artisan Pizza and Flatbread in Five Minutes a Day by Jeff Hertzberg and Zoë François

French Flag France [ print this recipe for Balthazar Goat Cheese and Onion Pizzette ]

Savory Brioche Recipe

brioche doughTraditional brioche is sweetened with a bit of sugar or honey and is used in savory recipes as well as desserts. For this book we decided to go to extremes: a dough that is sweet for our dessert pizzas and this version, with no sugar at all, for the savory pies. They are both rich and flavorful, but in two distinct ways.

Makes enough dough for at least eight 1/2 pound pizzas or flat-breads (about 12 inches across). The recipe is easily doubled or halved.

Ingredients:
1 1/2 cups lukewarm water
1 tbsp granulated yeast
1 tbsp Kosher salt.
6 large eggs, lightly beaten
6 1/2 cups unbleached, all-purpose flour
1 cup (2 sticks) unsalted butter, melted and slightly cooled

Preparation:
  1. Mixing and storing the dough: Mix the yeast, salt, and eggs with the water in a 5 quart bowl, or a lidded (not airtight) food container.
  2. Mix in the flour and butter without kneading, using a spoon, a 14-cup capacity food processor (with dough attachment), or a heavy duty stand mixer (with paddle). If you're not using a machine, you may need to use wet hands to incorporate the last bit of flour.
  3. Cover (not airtight), and allow it to rest at room temperature until the dough rises and collapses (or flattens on top), approximately 2 hours.
  4. The dough will be loose, but will firm up when chilled. Don't try to use it without chilling for at least 3 hours or until firm. Refrigerate it in a lidded (not airtight) container and use over the next 5 days. Or store the dough for up to 3 weeks in the freezer in 1/2 pound portions. When using frozen dough, thaw it in the refrigerator overnight before use.
  5. On pizza or flatbread day, roll out or stretch the dough into a thin round and finish with your favorite toppings, using many of the recipes in this book.
Recipe courtesy of Artisan Pizza and Flatbread in Five Minutes a Day by Jeff Hertzberg and Zoë François

French Flag France [ print this recipe for Savory Brioche ]

Book Review: Ice Cream Happy Hour

ice cream happy hour coverIt’s never too early to get ready for summer. As the temperatures here begin to drop into the 50s and 60s, we’re already making preparations for next summer by trying a few recipes from the new cookbook, Ice Cream Happy Hour, by Valerie Lum and Jenise Addison. The book includes over 50 recipes for ice creams, sorbets, sundaes, and floats. The book is unique in that all of these desserts “merry” ice cream with alcohol to create a host of uniquely delicious desserts.

Authors Lum and Addison met while working together at a boutique beer shop in the Park Slope neighborhood of Brooklyn, New York. One night after work, they had a craving for a root beer float when they wondered what a chocolate stout float might taste like instead. Through trial and error they developed this and many other recipes included in Ice Cream Happy Hour. One key step that makes many of these recipes possible was in fact perfected by authors Lum and Addison. This technique is the process of combining alcohol spiked gelatin with custard to make booze infused ice cream.

We tried two recipes from Ice Cream Happy Hour. The first was Maple with Bourbon Ice Cream. This recipe takes a little patience since you have to wait several hours for the custard to cool completely before spiking and churning it to get the ice cream. However, the end result was a restaurant grade dessert with perfect texture and flavor. The second recipe that we tried was the Margarita Sorbet. This recipe had fewer steps and was easier to make. This dessert tasted just like a frozen margarita in sorbet form. We really liked this book because it gives you a basic set of steps that are used to make all of the recipes. Once you have tried a few of the desserts, you have all of the tools that you need to make your own creations. We give this book four out of five stars.

Margarita Sorbet Recipe

frozen margarita sorbetFresh lime juice is key for this sorbet's flavor. Don't use concentrate and don't even think about using the plastic lime-shaped squeeze bottles.

Recommended Equipment:
ice cream maker

Ingredients:
2 1/2 cups cold water, divided
1/2 cup sugar
grated zest of 3 limes
1 1/2 cups cold fresh lime juice
1/2 packet (1/2 tablespoon) gelatin
1 1/2 ounces cold (refrigerated) Cointreau
2 1/2 ounces cold (refrigerated) white tequila (I used Tequila Partida Blanco)

Preparation:
  1. Make the syrup. In a medium saucepan, combine 2 cups water and the sugar and lime zest and simmer over medium heat until the sugar is completely dissolved, about 5 minutes. Remove the pan from the heat, cover it, and steep for at least 15 minutes.
  2. Cover and chill the syrup for at least 4 hours.
  3. Once the syrup is completely cold, add the juice. Pour the cold lime juice into a large bowl. Stream the cold syrup into the juice and whisk until combined.
  4. Dissolve the gelatin in the remaining 1/2 cup of cold water. Pour 1/2 cup of cold water into a small saucepan and evenly sprinkle the gelatin on top of the water. Allow to sit for about 2 minutes so that the gelatin can absorb as much water as possible. Gently warm over low heat and stir until the gelatin is completely dissolved into the liquid, about 3 minutes.
  5. Spike the syrup with cold Cointreau, tequila, and gelatin mixture. Pour the gelatin into a mixing bowl and whisk in the cold alcohol until combined. Whisk until thoroughly blended.
  6. Churn the sorbet for at least 20 minutes. Due to the alcohol content, you may wish to churn it longer to get the desired thickness. If you don't want to serve it immediately, or you want a firmer texture, transfer it to a freezer-proof container and freeze for several hours before serving.
Makes about 1 quart.

Recipe courtesy of Ice Cream Happy Hour by Valerie Lum and Jenise Addison

Mexican flag Mexico [ print this recipe for Margarita Sorbet ]

Compote of Apples (Compote de Pommes) Recipe

compote of appleThis recipe for compote of apples can be used as a stand alone dessert or it can be used as a topping. Compote of apples can also be served at breakfast with pancakes or French toast.

Ingredients:
6 fresh apples - I used McIntosh
2/3 cup granulated sugar
1/4 cup water
zest of 1/2 lemon
juice of 1/2 lemon
pinch nutmeg
pinch of cinnamon

Preparation:
  1. Peel the apples and cut out their cores.
  2. In a small saucepan over medium heat, add the water, 3 of the apples, and the sugar. Cook for 1 minute.
  3. Add the lemon zest and lemon juice.
  4. When the apples are blanched, remove the apples and leave the remaining syrup in the saucepan. Reduce the heat to medium low.
  5. Add the remaining apples to the saucepan and cook them down to a jelly.
  6. Pour the jelly over the apples and top with pinches of nutmeg and cinnamon.
French Flag France [ print this recipe for compote of apples ]

Maple with Bourbon Ice Cream Recipe

maple bourbon ice cream
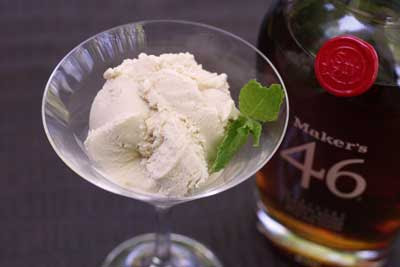
As a taste tester said of this recipe's surprisingly enticing flavor pairing, "This ice cream makes me want to get in a fight and eat some pancakes." A key component in our Nor'easter Float, this ice cream was inspired by the restaurant Char No. 4 in Brooklyn, where they use maple syrup in their version of the drink.

Recommended Equipment:
ice cream maker

Ingredients:
3/4 cup Grade B maple syrup
1 1/2 cups milk
1 1/2 cups heavy cream
2 tbsp brown sugar
4 egg yolks
2 tspn molasses
2 tbsp fresh lime juice
pinch f salt
1/2 packet (1/2 tbsp) gelatin
1/3 cup cold water
1/2 cup cold (refrigerated) bourbon - I used Maker's 46

Preparation:
  1. Reduce the maple syrup. In a small saucepan, heat the maple syrup over medium heat. Simmer, uncovered, until reduced by half, about 15 minutes. Set aside and allow to cool.
  2. Scald the milk, cream, and brown sugar. Mix the milk, cream, and brown sugar in a medium saucepan over medium low heat until the sugar is dissolved. Continue heating until the mixture is steamy and makes a slight sizzling noise when you move the pan.
  3. Whisk the egg yolks and temper with one-third of the scalding mil mixture. In a mixing bowl, whisk the eggs. Then while whisking the eggs, slowly stream in about 1/3 of the hot milk mixture.
  4. Thicken the custard over low heat. Pour the egg and the milk mixture that you have just tempered into the rest of the milk mixture in the saucepan and stir continuously on low heat with a heatproof spatula or flat ended wooden spoon. Make sure you scrape the bottom evenly while you continuously stir. The custard is thick enough when you can draw a line on the back of the spoon with your finger and the line retains its shape.
  5. Whisk in the molasses, maple syrup, lime juice, and salt.
  6. Strain, cover, and chill the custard for at least 8 hours. When covering the custard, be sure to use plastic wrap so that it is directly touching the entire surface of the custard and none of it is exposed to air.
  7. Once the custard is completely cold, dissolve the gelatin in the cold water. Pour 1/3 cup of cold water into a small saucepan and evenly sprinkle the gelatin on top of the water. Allow to sit for about 2 minutes so that the gelatin can absorb as much water as possible. Gently warm over low heat and stir until the gelatin is completely dissolved into the liquid, about 3 minutes.
  8. Spike the custard with the cold bourbon and gelatin mixture. Pour the gelatin into a mixing bowl and whisk in the cold alcohol until combined. Stream the alcohol and gelatin mixture through a fine mesh strainer into the custard mixture. Whisk until thoroughly blended.
  9. Churn the ice cream for at least 20 minutes. Due to the alcohol content, you may wish to churn it longer to get the desired thickness. If you don't want to serve it immediately, or you want a firmer texture, transfer it to a freezer-proof container and freeze for several hours before serving.
Makes about 1 quart

Recipe courtesy of Ice Cream Happy Hour by Valerie Lum and Jenise Addison

USA flag United States [ print this recipe for Maple with Bourbon Ice Cream ]

Book Review: Shucked: Life on a New England Oyster Farm

Shucked: Life on a New England Oyster FarmWhat did I know about oysters? In retrospect, next to nothing until I read
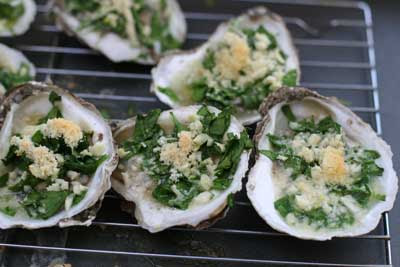
 Shucked, by Erin Byers Murray. In fact, my only experience with harvesting shellfish was limited to a couple of hours spent digging clams at a beach behind my sister’s apartment in Winthrop, Massachusetts. The only thing that I remember was the pain in my lower back and the relief that I felt when the tide finally rolled in and we had to call it quits for the day. It’s hard work! Yet the author of this book left her comfortable 9 to 5 job at Daily Candy to work for an oyster farm in Duxbury, Massachusetts for 18 months! Not since George Plimpton has a writer been this “imbedded” to cover a story and learn all that there is to know about delivering oysters from farm to table.

During her work at Island Creek Oysters, Murray did everything from separating and sorting oysters according to size and shape, a process known as culling, to washing and bagging oysters, to even working in the company’s front office. She was also responsible for managing the “seed” or baby oysters that would be nurtured until they were big enough to be planted in the company’s leased oyster beds in Duxbury Bay. A mistake made during this phase of her assignment could have cost the company its future crop of oysters, an error that could have been devastating to the company financially. Despite the mental and also physical challenges that came with this undertaking, Murray was able to capture a unique insider’s view into oyster farming and its place in the growing farm to table, slow food movement.

I’ve read this type of story many times before and each time I read it I love it even more. The Hero’s Journey, when an unlikely hero faces daunting physical and mental obstacles. With perseverance and a little help from mentors along the way, the hero becomes a master in their own right. Through the course of the book, the author takes this journey from oyster culling novice to “momma-seeda,” master of the “seed” to confidant of the company’s founder. Against this backdrop, Murray gives us an inside look at what it is actually like to work on an oyster farm – from production to marketing to customer relations. She also provides a historical account of the company itself from its modest beginnings to one of the most sought after brands of oysters today. In addition to having its oysters on the menus of marquee restaurants such as Per Se and The French Laundry, Island Creek now has its own restaurant in Boston, a venture with Boston-based Harpoon Brewery, and a philanthropic arm raising money through its annual Island Creek Oyster Festival for a business development project in Africa.

Murray has masterfully recounted this story along with her own experiences to create an intriguing look at what it takes to get oysters from farm to table. And if this were not enough, the book also includes an oyster or clam recipe at the end of each chapter. We tried one, Berg’s Baked Oysters, and it was fantastic. We give this book four out of five stars.

Berg's Baked Oysters Recipe

ShuckedFrom Shucked, by Erin Byers Murray....

Berg's off-the-cuff cooking methods came in handy a number of times that summer. This is his riff on the classic Rockefeller; it can be pulled together in minutes flat. Though Oysters Rockefeller might seem like the first course to some staid sit-down dinner, these are best eaten outside, on someone's deck, under the fading summertime sun - preferably near the water.

Ingredients:
2 dozen Island Creek Oysters                                              
1 cup baby spinach, chopped
3 tbsp minced garlic
3 tbsp butter
Couple handfuls of shredded Parmesan

Preparation:
  1. Preheat oven to 375 degrees Fahrenheit.
  2. Shuck the oysters, making sure to separate the bottom muscle but keep the meat intact in the shell.
  3. Top the meat with a couple pinches of spinach, 1/4 teaspoon garlic, a small pat of butter, and a couple of pinches of Parmesan.
  4. Arrange on a baking sheet and bake for about 5 minutes or until Parmesan is melted.
Serves 6

Recipe courtesy of Shucked by Erin Byers Murray

USA flag United States [ print this recipe for Berg's Baked Oysters ]

Oysters

Book Review: Ramen To The Rescue Cookbook

I have to admit, I haven’t cooked ramen noodles since my college days at Oregon State University when time and more importantly money were in short supply. I remember that when I was ready to graduate, I was completely sick and tired of eating ramen. So when I was asked to review the book, Ramen to the Rescue by Jessica Harlan, I approached the task with some trepidation. Anyway, the book begins with a brief history of ramen noodles and how the instant version is made. Harlan then draws upon her experience as a kitchenware writer for about.com and Clean Eating Magazine to recommend “must-have” kitchenware as well as suggesting pantry items needed to prepare her ramen based dishes.

This book is rather small as cookbooks go but is packed with over 100 recipes. Most, including the two that we tried, use only the noodles from the ramen noodle package and do not include the sodium laced flavor package. Instead, each recipe builds its flavor from fresh vegetables, seasonings, and other ingredients that are combined with the noodles to create fast, healthy, great tasting meals.

In our review, we made Pad Thai and Cold Sesame Noodles. Both dishes were incredibly easy to make. In fact, we didn’t even need to buy any additional ingredients other than the ramen noodles in order to make them. We liked the fact that the book includes both small recipes (1 to 2 servings) and extremely large recipes (8 to 10 servings). This is a great little cookbook for large families or anyone who wants to learn how to make faster, easier, and more economical meals. We give Ramen to the Rescue three out of five stars.

Hangtown Fry Recipe

hangtown fryThis recipe was developed in California during the Gold Rush. Apparently a miner had just "struck it rich", discovering a substantial amount of gold on his claim. To celebrate after a night of celebration, he went into a restaurant and asked for the best breakfast that money could buy. The cook made up what is now known as the Hangtown Fry, named after the preferred sentence by the town's law enforcement community of the day.

Ingredients:
6 fresh, shucked oysters
1/4 cup flour
1/4 cup bread crumbs
6 eggs, beaten
3 tbsp milk
4 strips of bacon
2 tbsp unsalted butter
salt and pepper to taste
cilantro

Preparation:
  1. In a mixing bowl, mix together the flour and bread crumbs. Set aside.
  2. Shuck 6 oyster; Place oysters and liquor in a bowl. Set aside
  3. In another mixing bowl, beat the 6 eggs. Whisk in the milk and the liquor from the oysters.
  4. In a large non-stick skillet over medium heat, cook the bacon until it is crispy. Remove the bacon and set aside. Discard all but about 1 tbsp of bacon fat and add the butter to the skillet.
  5. Dip the oysters in the egg mixture and then roll them in the flour and breadcrumbs.
  6. Fry the oysters in the skillet over medium heat for about 30 seconds each side or until lightly brown.
  7. Move the oysters to one side of the skillet and pour the egg mixture on the other side.
  8. When the egg begins to thicken, crumble the bacon onto the egg and move the oysters onto the egg as well.
  9. Fold the egg over like an omelet allowing any uncooked egg to cook.
  10. Season with salt and pepper. Serve hot with cilantro garnish.
Serves 2 to 3

USA flag United States [ print this recipe for Hangtown Fry ]

Cold Sesame Noodles Recipe

cold sesame noodlesAt once sweet, spicy, nutty, and cool, cold sesame noodles have always been one of my favorites on Chinese take-out menus. This is ideal picnic fare. The noodles will stay fresh for a few hours even if they're not refrigerated, and there's nothing in the dish that will spoil.

Ingredients:
1/4 cup smooth peanut butter
1 tbsp + 1 tspn rice vinegar
1 tspn soy sauce
1 tspn brown sugar
1/4 tspn minced garlic
1/2 tspn grated fresh ginger
1/2 tspn sesame oil
1 package ramen noodles, any flavor
1 tbsp sesame seeds plus more for garnish
1 scallion, green and light green parts, thinly sliced
1/4 cup diced peeled cucumber

Preparation:
  1. In a small bowl, whisk together the peanut butter, rice vinegar, soy sauce, brown sugar, garlic, ginger, and sesame oil. Set aside.
  2. Cook the ramen noodles in boiling water for 2 1/2 minutes (discard the ramen seasoning). Drain in a colander then return the hot noodles immediately to the pot. Add the sauce and stir to coat completely. Stir in 1 tbsp sesame seeds. To serve, place the noodles in a bowl and top with the scallions, cucumber, and additional sesame seeds. The noodles will keep, covered and refrigerated, for 2 to 3 days. If the noodles clump together, break them up a little with a fork before serving.
Serves 2

Recipe courtesy of Ramen To The Rescue Cookbook by Jessica Harlan

Chinese Flag China [ print this recipe for Cold Sesame Noodles ]

Pad Thai

pad thai
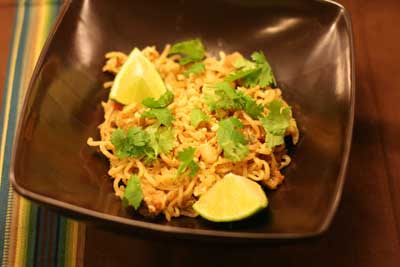
This traditional Thai noodle dish is usually made with long, chewy rice noodles, but ramen noodles make a fine stand-in. You might be surprised to learn how few ingredients the sauce contains, considering it achieves such a complex-tasting balance of salty, sweet, sour, and spicy. Look for tamarind paste and fish sauce in the Asian section of your supermarket, and refrigerate what you don't use for this dish; both ingredients last for months.

Ingredients:
3 tbsp tamarind paste
3 tbsp fish sauce
1/4 cup brown sugar
2 tspn soy sauce
1/2 tspn Thai chili paste
1 package ramen noodles, any flavor
2 tspn vegetable oil
3 oz. baked tofu, Thai flavor
2 scallions, light green and white parts, thinly sliced
1 large egg

Garnishes:
2 tbsp chopped peanuts
1/4 cup mung beans
1 tbsp chopped cilantro
2 lime wedges

Preparation:
  1. In a small saucepan, combine the tamarind paste, fish sauce, and brown sugar. Bring to a simmer over medium-high heat and cook until thickened and the brown sugar is melted, about 5 minutes. Stir in the soy sauce and 1/2 tspn chili sauce or to taste. Remove from the heat and set aside.
  2. Break the ramen noodles into 4 pieces and cook in boiling water for 3 minutes, or according to the package directions (discard the ramen seasoning). Drain.
  3. Heat the vegetable oil over high heat. Add the noodles, tofu, and scallions, and stir-fry for 3 to 5 minutes. Reduce the heat to medium and break the egg into the pan. Stir the egg into the noodle mixture until the egg is scrambled, 45 seconds to 1 minute. Pour the sauce into the pan and cook until all of the ingredients are heated through, 2 to 3 minutes, stirring to combine all the ingredients.
  4. To serve, transfer to a serving bowl. Garnish with the peanuts, mung beans, cilantro, and lime.
Serves 2

Recipe courtesy of Ramen To The Rescue Cookbook by Jessica Harlan

Thai flag Thailand [ print this recipe for Pad Thai ]

Book Review: 300 Best Rice Cooker Recipes

300 best rice cooker recipesIf you’re like me, you think of rice cookers as somewhat one dimensional – they cook rice. After reading 300 Best Rice Cooker Recipes, by Katie Chin, I realized that this is simply not the case. Rice cookers can be used for a wide range of culinary applications from cooking healthy grains and legumes, soups, steamed dishes, desserts, and one pot (slow cooker type) meals. Katie Chin draws upon her experience as a private chef and food consultant specializing in Pan-Asian cuisine, to create a diverse set of delicious recipes specifically designed for slow cookers.

Chin provides detailed descriptions of the three major types of rice cookers including simple on/off cookers, fuzzy logic cookers with complex self-monitoring capabilities, and induction heat models) as well as instructions on how to use them with her recipes. She also explores the different types of rice, grains, and legumes available along with cooking charts that describe how to prepare them. Each chart includes the type of rice, grain, or legume along with the amount of liquid, cooking time, and recommended settings to use for each type of rice cooker.

During our review of this book, we chose two Thai recipes, Thai Fish Curry on Jasmine Rice and Chicken with Fresh Mint and Basil. We also chose two European recipes, Risotto Milanese and Buttery Smashed Kohlrabi. Both Thai recipes were easy to prepare and had a perfect balance of sweet and spicy flavor. The choice of Risotto Milanese was a difficult one because Chin’s book includes seventeen different risotto recipes! All of which looked amazing and I’m sure we will try many of them in the near future. Anyway, the Risotto Milanese turned out great, had perfect texture and flavor along with a dramatic presentation with a bright yellow hue with crimson accents from the saffron. We pared this dish with Italian Meat Balls topped with a velouté sauce paired with a 2000 Chateau Pomerol – the dinner was 5-star! Risotto has a reputation as being rather labor intensive in its preparation, however, Chin’s recipe only involved adding the ingredients to the slow cooker and stirring the Abrorio rice three times during the 30 minute cooking cycle – SO EASY. We also wanted to try a recipe that involved steaming vegetables so we chose the Buttery Smashed Kohlrabi. This dish tasted similar to mashed potatoes and it could be used as a lighter, healthier side for a steak or chicken entrée.

We give Katie Chin’s 300 Best Rice Cooker Recipes five stars out of five. The recipes that we tried seemed very well tested. We followed the measurements and instructions explicitly and all four recipes that we tried turned out perfect without any need for minor adjustments. Even more impressive, we achieved these results despite the fact that we were using a crude, 20 year old, on/off type rice cooker (see below). The book includes so many tempting, delicious recipes that it should appeal to most cooks regardless of their preference in cuisine. Katie Chin has drawn from both Asian and European classics to create the definitive collection of rice cooker recipes.

rice cooker

Buttery Smashed Kohlrabi

Kohlrabi is a derivative of the cabbage plant, but its flavor is at once milder and slightly sweeter than its kin.

Tip:
For a smoother consistency, use a food processor or blender to mash the kohlrabi mixture.

Recommended Equipment:
Medium to large rice cooker with a steamer basket; fuzzy logic or on/off


Ingredients:
Nonstick cooking spray
1 large kohlrabi, peeled and cut into cubes (about 4 cups/1 L)
1 clove garlic, minced
1/4 cup sour cream
2 tbsp butter
1/2 cup whole or 2% milk (approx.)
salt and freshly ground black pepper
snipped fresh chives

Preparation:
  1. Place 4 cups (1 L) water in the rice cooker bowl and set the rice cooker for the Regular or Steam cycle.
  2. Spray the steamer basket with cooking spray. Place kohlrabi in the basket. When the water comes to a boil, place the basket in the rice cooker. Set a timer for 15 minutes.
  3. When the timer sounds, check to make sure kohlrabi is tender. If necessary, continue cooking, checking for doneness every 3 minutes.
  4. Transfer kohlrabi to a large bowl. Add garlic, sour cream and butter; mash with a potato masher or fork, adding milk as needed, until smooth. Season to taste with salt and pepper. Serve warm, garnished with chives.
Variation:
Buttery Smashed Bacon Kohlrabi: Add 1/2 cup (125 mL) chopped cooked bacon with the garlic.

Makes 4 servings

Recipe courtesy of 300 Best Rice Cooker Recipes by Katie Chin

German flag Germany [ print this recipe for Buttery Smashed Kohlrabi ]

Chicken with Fresh Mint and Basil Recipe

fresh mint and basilThis simply prepared dish takes me right back to my honeymoon in Chiang Mai. The combination of fresh mint, coconut milk, Thai basil and chiles is magical.

Tip:
Be careful when handling chile peppers. They contain oils that can burn your skin and especially your eyes. Wear rubber gloves or try generously greasing your fingers with shortening.

Recommended Equipment:
Medium rice cooker; fuzzy logic or on/off

Ingredients:
1 cup Thai jasmine rice, rinsed and drained
3/4 cup coconut milk
3/4 cup water
3 tbsp vegetable oil
4 cloves garlic, minced
3 shallots, thinly sliced
2 Serrano chile peppers, seeded and cut into thin strips
3/4 cup packed fresh Thai basil leaves, thinly sliced, divided
1 pound boneless skinless chicken breasts, cut into 1/2 inch (1 cm) pieces
2 tbsp granulated sugar
pinch freshly ground white pepper
3 tbsp fish sauce (nam pla)
2 tbsp water
1/4 cup packed fresh mint leaves

Preparation:
  1. In the rice cooker bowl, combine rice, coconut milk and water. Set the rice cooker for the Regular cycle. At the end of the cycle, hold rice on the Keep Warm cycle.
  2. In a wok or large nonstick skillet, heat oil over medium-high heat. Stir-fry garlic and shallots for about 2 minutes or until shallots are softened and translucent. Add Serrano peppers and two-thirds of the basil; stir-fry for 1 minute or until basil wilts. Add chicken and stir-fry for 3 minutes. Add sugar, pepper, fish sauce and water; stir fry for about 2 minutes or until sauce bubbles and thickens. Add mint and the remaining basil; stir-fry for 5 to 10 seconds.
  3. Fluff rice with a wooden spoon or plastic paddle and scoop onto serving pates or into bowls. Top with chicken stir-fry. Serve immediately.
Variations:
Shrimp with Fresh Mint and Basil on Thai Jasmine Rice:
Substitute 1 lb (500 g) medium shrimp, peeled and deveined, for the chicken breasts.

For a spicier version of this dish, replace the Serrano peppers with 1 Thai chile pepper, sliced, with seeds, or add 1 tspn (5 mL) Thai chili sauce (such as Sriracha).

Serrano Peppers
The Serrano pepper is a smaller version of the jalapeño but is said to be five times as hot! Serranos have thin walls, so they don't need to be charred, steamed or peeled before use. They are perfect for salsas, relishes and garnishes, and taste great when roasted. They are commonly used in Thai and Mexican dishes.

Makes 4 servings.

Recipe courtesy of 300 Best Rice Cooker Recipes by Katie Chin

Thai flag Thailand [ print this recipe for Chicken with Fresh Mint and Basil ]
Related Posts Plugin for WordPress, Blogger...