HOME ABOUT REVIEWS INTERVIEWS SUBSCRIBE CONTACT FACEBOOK TWITTER

Herb Roasted Cauliflower with Shiitake Mushrooms Recipe

cauliflower and Brussels sproutsWhen I first discovered how creamy and smooth cauliflower became when puréed, I knew it had much more potential than I had given it credit for in my cauliflower-hating youth. Now, I can hardly get enough. The caramelized mushrooms and Brussels sprouts in this recipe are a wining combination, and roasting brings out the earthy taste of the cauliflower even more. Serve it with French lentils or wild rice for a warm and tasty winter meal.

Ingredients:
1 large head cauliflower
1 1/2 dozen Brussels sprouts
1/2 pound shiitake mushrooms
2 garlic cloves, peeled
1/4 cup fresh sage leaves (or 1 1/2 tbsp dried)
1/4 cup fresh oregano (or 1 1/2 tbsp dried)
2 tspn coarse sea salt
1/4 cup extra virgin olive oil

Preparation:
  1. Preheat oven to 400 degrees Fahrenheit.
  2. Prepare cauliflower by removing and discarding outer leaves and inner stems. Cut florets into small pieces and place in a large mixing bowl. Prepare Brussels sprouts by cutting away and discarding dry ends. Halve sprouts and place in bowl with cauliflower. Remove stems from shiitake mushroom caps, slice caps into 1/4 inch strips and add to vegetables.
  3. With food processor running, drop in garlic cloves and process until minced. Add sage, oregano, salt, and oil and pulse briefly to chop herbs and blend ingredients. Remove from processor bowl and fold into vegetables to coat evenly. Transfer to a baking dish and roast 15 minutes. Remove from oven, toss to redistribute and prevent burning, and roast for an additional 15 - 20 minutes or until tender.
  4. Remove from oven and serve.
Tip: If Brussels sprouts are particularly large, you may want to cut them into quarters instead of halves.

Serves 4

Recipe courtesy of Clean Start: Inspiring You to Eat Clean and Live Well by Terry Walters

USA flag United States [ print this recipe for Herb Roasted Cauliflower with Shiitake Mushrooms ]

Cinnamon Crumb Cake Recipe

cinnamon crumb cakeThis is an easy recipe that takes only minutes to prepare when you have a supply of yellow dough on hand. It works as a dessert, snack, or breakfast. Try it with a cafe noir.

Recommended Equipment:

stand mixer
8 X 8 baking pan

Ingredients:
1 unit of yellow dough
3 tbsp melted, unsalted butter
3 tbsp vegetable shortening
2 tbsp unsalted butter
1/3 cup light brown sugar
1/3 cup sugar
1 tspn cinnamon
1 tspn honey
1/8 tspn salt
2/3 cup all-purpose flour

Preparation:
  1. Grease the 8 X 8 baking pan.
  2. Spread dough over the bottom of the baking pan. You do not need to form a lip.
    dough in the pan
  3. Using a mixer, cream together the shortening, 2 tablespoons of butter, sugar, brown sugar, cinnamon, honey, and salt.
  4. Add flour and mix in using your hands to form crumbs.
  5. Brush the 3 tablespoons of melted butter over the top of the dough.
  6. Evenly distribute the cinnamon crumb mixture that you have made over the top of the dough.
  7. Set the baking pan in a warm place to proof for at least 1 hour.
  8. Preheat oven to 375 degrees Fahrenheit.
  9. Place pan in the center of upper rack and bake for 20 to 25 minutes.
  10. Let cake cool for 10 minutes then cut and serve.
    crumb cake - just out of the oven
German flag Germany [ print this recipe for Cinnamon Crumb Cake ]

Power Food Salad Recipe

power food saladA fantastic source of protein! I often add low-fat feta to this salad.

Ingredients:
1 X 150g (5oz.) can chickpeas
1 X 150g (5oz.) can 3 bean mix
1 large red onion, finely diced
1 green apple
2 large celery sticks
2 carrots
Juice and zest of 1/2 lemon
6 egg whites
1 cucumber, diced
1 cup fresh podded peas
1/2 bunch dill, leaves picked
180g (6oz.) hot smoked salmon, flaked
1 tbsp each pumpkin and sunflower seeds
2 tbsp olive oil
Low-fat feta cheese to garnish (optional)

Preparation:
  1. Rinse and drain chickpeas and mixed beans. Place into a bowl with finely chopped red onion. Using a juicer, juice apple, 1 celery stick and 1 carrot. Mix with lemon juice and zest. Pour this juice over chickpea, bean, and onion mix, cover and refrigerate overnight.
  2. Lightly beat egg whites and pour into a large hot non-stick skillet (frying pan). Cook a few minutes each side, then turn the omelet out onto a board and roll up. Allow to cool and slice finely.
  3. Drain the chickpea and bean mixture. Place into a large bowl, retaining the liquid. Add 1 diced cucumber, 1 diced celery stick, 1 diced carrot and the smoked salmon with all remaining ingredients.
  4. Whisk half of the reserved liquid with olive oil and drizzle over the salad to serve. Crumble feta over the top if desired.
Serves 4

Recipe courtesy of Blood Sugar: Inspiring Recipes For Anyone Facing The Challenge of Diabetes and Maintaining Good Health by Michael Moore.

Australia

Schnecken Recipe

Schnecken is a traditional German breakfast pastry usually served on the weekends. Schnecken means snail which that refers to the pastry's coiled shape. It is similar to a regular cinnamon roll but it is baked in a butter-sugar paste that becomes a caramel glaze. When the schnecken is removed from the oven, it is inverted and placed on the serving plate. The sweet, gooey, caramel glaze then runs down all sides of the schnecken making it an irresistible treat.

Note: you will need to prepare a batch of yellow dough before making this recipe for schnecken.

Recommended Equipment:
9 in. x 5 in. bread pan
rolling pin

Ingredients:
1 tbsp raisins
6 tbsp unsalted butter, at room temp.
6 tbsp salted butter, at room temp.
3 tbsp unsalted butter, melted
1 unit of yellow dough
1/4 tspn cinnamon
1/2 cup sugar
1 egg
1cup water

Preparation:
  1. Soak raisins in a small bowl of water overnight.
  2. Grease a 9 in. x 5 in. bread pan.
  3. Beat together the salted and unsalted butter and spread it evenly on the bottom of the bread pan.
  4. In a small bowl, create an egg wash by mixing together the egg and 1 cup of water. Set aside.
  5. In another small bowl, mix together the cinnamon and sugar. Set aside.
  6. Dust a flat surface, a rolling pin, and the dough with flour. Roll the dough out into a 4 inch by 18 inch rectangle. Dust off any excess flour from both sides of the rolled dough.
  7. On one of the 4 inch ends of the dough, Wash a 1 inch section at the end of the dough with the egg wash mixture. Cover the remaining dough with the 3 tablespoons of melted butter.
  8. Spread the sugar and cinnamon mixture over the buttered portion of the dough.
  9. Drain the water from the raisins. Sprinkle the raisins over the sugar and cinnamon mixture.
  10. Roll up the dough toward the short end of the dough where you applied the egg wash. Try to keep the roll tight and straight. Seal the roll with the egg wash section.
  11. Cut the roll into 3 even pieces and place them, cut-side up, in the buttered bread pan.
  12. Let proof in a warm place for at least an hour until the rolls double in size.
  13. Preheat oven to 375 degrees Fahrenheit.
  14. Place the bread pan on a baking sheet to catch any excess butter that may bubble over the side of the pan. Place the pan and baking sheet into the oven.
  15. Bake for 45 minutes. After baking the schnecken for 20 minutes, use a spatula to push down the dough back into the pan. Do this a second time at 40 minutes as well.
  16. When the schnecken is golden brown on top, remove the pan from the oven.
  17. Turn them out onto a serving dish. Let cool for 5 minutes then serve.
German flag Germany [ print this recipe for schnecken ]

Yellow Dough Recipe

scale with doughIn our quest for the best cinnamon breakfast dish for the holiday season, we prepared this batch of yellow dough. This recipe for yellow dough is a base component of three other recipes that we will be posting shortly. These include recipes for cinnamon crumb cake, schnecken (snail shaped cinnamon rolls), and Hungarian bundt cake. All of these are ideal for holiday gatherings because you can make the dough in bulk, freeze it, and then use it when you need it thus reducing the prep time on the day of the gathering.

After you make the dough, divide it into 8 units about 12 to 13 ounces each. (The piece in the picture is a little too big). Wrap each unit in plastic wrap and then package 3 to 4 units in a thick sealed freezer bag. If you use this process, you can store them in the freezer for up to 1 month.

Recommended Equipment:
kitchen scale

Ingredients:
3 packages (0.75 oz. each) of instant dry yeast
2 cups warm water
3 cups all-purpose flour
4 tspn salt
1 1/4 cup sugar
1 cup vegetable shortening
1/2 cup egg yolks
1 stick (8 tbsp) unsalted butter
1 cup milk
1 cup water
6 cups all-purpose flour
3 cups winter (pastry) flour

Preparation:
  1. In a medium to large mixing bowl, mix the yeast into the warm water and let sit for 5 minutes.
  2. Add flour to the bowl and mix well.
  3. Cover bowl with a towel and place in a warm place. Let rise until the dough doubles in size. This will take between 1 and 2 hours.
  4. In a large mixing bowl, mix together the sponge with the salt, sugar, shortening, egg yolks, butter, milk, water, and flour. The dough should be soft, moist and sticky. If it is too wet and is more like a batter, add some additional flour.
Recipe makes about 6 1/2 pounds of yellow dough.

German flag Germany [ print this recipe for Yellow Dough ]

Asian Beef and Bok Choy Recipe

beef bok choyBok choy is a versatile vegetable used frequently in Chinese stir-fries, appetizers, and main dishes. Also known as pak choi, it cooks quickly, so it is added toward the end of the cooking time.

Ingredients:
2 tbsp olive oil
1 onion, roughly chopped
Freshly ground black pepper
4 garlic cloves, peeled and left whole
2 inches (5 cm) piece of fresh ginger, peeled and sliced
2 dried chilies, left whole
2 star anise
2/3 cup Chinese rice wine or dry pale sherry
2 tbsp demerara sugar
2 tbsp oyster sauce
1 tbsp dark soy sauce
1 tsp toasted sesame oil
2 1/2 pounds (1.1 kg) beef shank, cut into bite-sized pieces
9 oz (250 g) bok choy, sliced lengthwise

Preparation:
In the slow cooker:
  1. Preheat the slow cooker, if required. Heat the oil in a large Dutch oven over medium heat, add the onion, and cook for 3 – 4 minutes until soft. Season with pepper, then stir in the garlic, ginger, chilies, and star anise.
  2. Increase the heat, pour in the Chinese wine or sherry, and let it simmer for a few minutes. Stir in the sugar, oyster sauce, soy sauce, and sesame oil. Boil for a minute, then reduce to a simmer, add the beef, and stir to coat.
  3. Transfer everything to the slow cooker and pour in just enough water to cover. Cover with the lid and cook on auto/low for 6 – 8 hours. Add the bok choy for the last hour of cooking, pushing it under the liquid slightly so it doesn’t go dry at the edges. Remove the whole dried chilies and serve with white rice.
Traditional method:
  1. Preheat the oven to 325 degrees Fahrenheit (160 degrees Celsius). Heat the oil in a large Dutch oven over medium heat, add the onion, and cook for 3 – 4 minutes until soft. Season with pepper, then stir in the garlic, ginger, chilies, and star anise.
  2. Increase the heat, pour in the Chinese wine or sherry, and let it simmer for a few minutes. Stir in the sugar, oyster sauce, soy sauce, and sesame oil. Boil for a minute, then reduce to a simmer, add the beef, and stir to coat.
  3. Pour over just enough water to cover, cover with the lid, and put in the oven for 2 – 2 1/2 hours, until the meat is tender. Check occasionally that it’s not drying out, topping up with a little hot water if needed. Add the bok choy for the last 15 minutes of cooking, pushing it under the liquid slightly so it doesn’t go dry at the edges. Remove the whole dried chilies and serve with white rice.
Serves 4 - 6

Recipe courtesy of The Slow Cook Book by Heather Whinney

Chinese Flag China [ print this recipe for Asian Beef and Bok Choy ]

Malaysian Mango Curry Recipe

Malaysian Mango CurryThis is much lighter in flavor than lots of other curries. Plenty of lime, ginger, and cilantro make up its basis, and of course, you could always add some cooked chicken or fish if you wish.

Ingredients:
2 tsp ground turmeric
2 red chilies, seeded
4 garlic cloves, peeled and left whole
2 inches (5cm) piece of fresh ginger, peeled and roughly chopped
1 tbsp sunflower oil
8 shallots, very finely chopped
Salt and freshly ground pepper
14 oz. (400 ml) can coconut milk
1/3 cup hot vegetable stock for the slow cooker (1/2 cup for the traditional method)
Juice of 1 - 2 limes
1 tbsp demerara sugar (optional)
5 1/2 oz. (150g) vermicelli noodles, soaked in water and drained
2 ripe mangoes, peeled and cut into bite-sized pieces
Bunch of cilantro, finely chopped

Preparation:
In the slow cooker:
  1. Preheat the slow cooker, if required. Put the turmeric, chilies, garlic, and ginger in a food processor, blend with half the oil to make a paste, and set aside. Alternatively, grind the ingredients with a pestle and mortar.
  2. Heat the remaining oil in a large, heavy saucepan over medium heat, add the shallots, and cook for 3 – 4 minutes until soft. Season with salt and pepper, then add the paste and cook, stirring occasionally, for a few more minutes. Pour in the coconut milk and stock, and bring to a boil. Transfer everything to the slow cooker, cover with the lid, and cook on high for 3 – 4 hours.
  3. Stir in the lime juice, to taste, and adjust the flavor with a little sugar and seasoning if needed. Stir in the noodles, mango, and cilantro.

Traditional method:
  1. Put the turmeric, chilies, garlic, and ginger in a food processor, blend with half the oil to make a paste, and set aside. Alternatively, grind the ingredients with a pestle and mortar.
  2. Heat the remaining oil in a large, heavy saucepan over medium heat, add the shallots, and cook for 3 – 4 minutes until soft. Season with salt and pepper, then add the paste and cook, stirring occasionally, for a few more minutes. Pour in the coconut milk and stock, and bring to a boil. Reduce the heat to low, partially cover with the lid, and leave to simmer for about 40 minutes, until the sauce has thickened.
  3. Stir in the lime juice, to taste, and adjust the flavor with a little sugar and seasoning if needed. Stir in the noodles, mango, and cilantro.
Serves 4

Recipe courtesy of The Slow Cook Book by Heather Whinney

Malaysia flag Malaysia [ print this recipe for Malaysian Mango Curry ]

Book Review: the Bonne Femme Cookbook

Bonne Femme Cookbook coverIt’s been said that the three nations with the deepest, richest culinary traditions are China, France, and Italy. The Bonne Femme Cookbook by Wini Moranville, provides a solid introduction to the French culinary tradition by introducing readers to the “bonne femme” style of cooking. Translated into English, bonne femme literally means “good wife” but this expression also refers to a culinary style that uses fresh, honest, simple, everyday ingredients and cooking methods. The bonne femme way is how the average French family cooks. They start with fresh ingredients that are in season and they transform these ingredients into simple, delicious dishes using the most basic techniques. The ingredients used are, for the most part, inexpensive and easy to substitute if unavailable. The Bonne Femme Cookbook was inspired by this simple style of cooking that the Author experienced during her many visits to France.

Wini Moranville is extremely knowledgeable about French cuisine and culture. She first visited the country with her high school class when she was only 17 years old and has returned to France often for both work and leisure. In fact, during the last 20 years she has spent each of her summer vacations in France. During her many visits, she has had extended stays in Burgundy, Fleurance, French Cataluña, and the Poitou-Charentes regions to name a few. She shares many of her experiences from these stays in the descriptions of her recipes as well as in special “Culinary Travels” sections that appear throughout the book.

The Bonne Femme Cookbook is packed with over 250 recipes ranging from French classics that use inventive, time-saving short-cuts to new dishes that use traditional French cooking methods and ingredients. In addition to the recipes, Moranville also includes several sections that focus on practical advice and techniques such as “using fresh versus dried herbs”, “stewing and roasting basics”, “prepping chicken”, and a “goat cheese primer” for example. As if this were not enough, the book is filled with beautiful illustrations by Nishon Akgulian and has a unique letter press cover.

In our review of the Bonne Femme Cookbook, we first tried an aperitif called a Kir that is made with crème de casis, cognac, and champagne. We found these drinks to be refreshing ice-breakers that would make a great start to any dinner gathering. We moved on to try the chicken calvados, a classic dish popular in Normandy. This recipe was fast and easy to prepare and featured the delectable flavor combination of chicken and apples. We also tried another classic French dish, Coq au Vin, in which the Author simplifies the recipe by using frozen pearl onions instead of boiling and pealing them in the traditional manner. Despite the instructions in this recipe to leave the skin on the chicken, we removed it to cut down on the amount of fat and the dish was still outstanding.

Based on the recipes that we tried, we give the Bonne Femme Cookbook five stars out of five. There are a lot of reasons to love this book. In addition to its many delicious, easy, time saving recipes that will appeal to any cooking enthusiast, the book is beautifully organized and illustrated. The Bonne Femme Cookbook may become a timeless culinary work in the same way that “Mastering the Art of French Cooking” by Julia Child has inspired chefs around the world. It is a must read in that it not only teaches the Bonne Femme way of cooking, but it also introduces readers to the cuisine, culture, and country that is France.

Spanish Lentils Recipe

spanish  lentilsThis classic Spanish dish of brown lentils relies on salty bacon, spicy chorizo, and paprika for its flavor. The lentils benefit from slow cooking as they become soft, tender, and don’t need soaking.

Ingredients:
2 1/2 cups brown lentils, rinsed and picked over for any stones
2 bay leaves
3 oz. (85 g) dried chorizo, sliced
2 tbsp olive oil
2 garlic cloves, sliced
1 small slice of bread
Salt
1 onion, finely chopped
2 1/2 oz. (75 g) thickly sliced bacon, cut into strips
1 tbsp flour
1 tsp sweet paprika
1/3 cup hot vegetable stock, for both methods

Preparation:
In the slow cooker:
  1. Preheat the slow cooker, if required. Put the lentils in the slow cooker with just enough water to cover, plus an extra 1/2 cup. Stir in the bay leaves and chorizo, cover with the lid, and cook on auto/low for 5-6 hours or on high for 3-4 hours.
  2. Meanwhile, heat 1 tablespoon of the oil in a heavy-based skillet over medium heat and cook the garlic, stirring, for about 30 seconds until softened but not browned. Remove and set aside. Add the bread to the pan and cook over medium heat until lightly browned on both sides. Transfer to a food processor with the garlic and season with salt. Process into coarse crumbs, then set aside.
  3. Add the remaining oil to the pan together with the onion and bacon. Cook for 3 – 4 minutes until the onion is soft and the bacon is cooked. Stir in the flour and paprika and cook for 1 minute before adding the stock. Bring to a boil and simmer for 2 minutes, then stir into the lentils for the last 30 minutes of cooking. Stir in the crumb mixture for the last 15 minutes of cooking. Transfer to a warmed serving dish and serve with crusty bread.

Traditional Method:
  1. Put the lentils into a large saucepan with 3 1/2 cups water, the bay leaves, and chorizo. Bring to a boil, then simmer for 35 – 40 minutes or until the lentils are tender.
  2. Meanwhile, heat 1 tablespoon of the oil in a heavy-based skillet over medium heat and cook the garlic, stirring, for about 30 seconds until softened but not browned. Remove and set aside. Add the bread to the pan and cook over medium heat until lightly browned on both sides. Transfer to a food processor with the garlic and season with salt. Process into coarse crumbs, then set aside. When the lentils are cooked, drain, then return to the saucepan. Stir in the crumb mixture until combined.
  3. Add the remaining oil to the heavy-based skillet together with the onion and bacon. Cook for 3 – 4 minutes until the onion is soft and the bacon is cooked. Stir in the flour and paprika and cook for 1 minute before adding the stock. Bring to a boil and simmer for 2 minutes, then stir into the lentils. If necessary, add a little more hot water to moisten the lentils. Transfer to a warmed serving dish and serve with crusty bread.
Serves 4

Recipe courtesy of The Slow Cook Book by Heather Whinney

Spanish flag Spain [ print this recipe for Spanish Lentils ]

Gluten Free Peanut Free Peanut Butter Blossom Cookie Recipe

Gluten Free Peanut Free Peanut Butter BlossomsFor all of you in search of a phenomenal gluten free and peanut free cookie recipe this holiday season, give this classic a try. Gluten free peanut free peanut butter blossoms are chewy, chocolatey, and SAFE!

Ingredients:
1 bag of Hershey's Kisses milk chocolate
3/4 cup Sunbutter Brand Creamy sunflower seed spread
1/2 cup shortening
1/3 cup granulated sugar
1/3 cup packed brown sugar
2 tbsp milk
1 egg
1 tspn vanilla extract
3/4 cup rice flour
3/8 cup tapioca flour (I used Bob's Red Mill Brand)
3/8 cup corn starch
1 tspn xanthum gum
1 tspn baking powder
1/2 tspn kosher salt
granulated sugar (for coating cookies)

Preparation:
  1. Preheat oven to 375 degrees Fahrenheit.
  2. Remove the wrappers from 36 of the Hershey's Kisses.
  3. In a large mixing bowl, beat together the sunflower seed spread and the shortening until well blended.
  4. Mix in 1/3 cup of granulated sugar and the brown sugar.
  5. Mix in the milk, egg, and vanilla extract.
  6. In a separate bowl, mix together the rice flour, tapioca flour, corn starch, xanthum gum, baking powder and salt.
  7. Gradually mix the flour mixture in with the dough mixture.
  8. Pour a couple of cups of granulated sugar into a small bowl.
  9. Shape the dough into 1 inch balls. Roll each ball in the granulated sugar and then place it on a lightly greased baking sheet.
  10. Bake the cookies for 8 to 10 minutes until lightly browned.
  11. Remove the cookies from the oven and then immediately place a Hershey's Kiss in the center of each cookie.
  12. Let cool and then serve. Store in an airtight container.
Makes about 36 cookies

USA flag United States [ print this recipe for Gluten Free Peanut Free Peanut Butter Blossoms ]

Banana and Berry Iced Smoothie Recipe

banana berry smoothieThis is an iced breakfast treat. Use ripe fruit.

Ingredients:
3 large ripe bananas, peeled and sliced
juice and zest of 1 lemon
1 tbsp agave syrup
1 cup non-fat natural yogurt
1 cup low-fat milk
1 cup bran
1 punnet (150 g/5 oz.) raspberries

Preparation:
  1. Blend bananas with lemon, agave, yogurt , milk and bran until smooth. Pour into a deep dish. Cover with plastic wrap and freeze until semi-frozen for about 2 hours.
  2. To serve, spoon balls of banana mixture and layer in tall glasses. Top with fresh raspberries; serve immediately.
Serves 4 - 6

Recipe courtesy of Blood Sugar: Inspiring Recipes for Anyone Facing the Challenge of Diabetes and Maintaining Good Health by Michael Moore

Australia [ print this recipe for Banana and Berry Iced Smoothie ]

White Ape Recipe

white apeThe first time that we tried a White Ape was at the Christkindlmarkt a couple of weeks ago. Christkindlmarkt is a Christmas street market that is usually held during the four weeks before Christmas. This tradition dates back to the Middle Ages. One of the oldest of these markets was first held in Dresden, Germany in 1434!

The market that we attended had the customary stalls featuring ornaments, decorations, and other arts and crafts items. It also had a "bar tent" featuring a host of cold and hot winter drinks. We tried several different drinks and the White Ape was our favorite. Here is how to make it.

Ingredients:
1 cup hot chocolate
1 shot Bailey's Irish Cream liqueur
dash of cinnamon
whipped cream

Preparation:
  1. Prepare hot chocolate as directed.
  2. Add Irish Cream liqueur and dash of cinnamon.
  3. Top with whipped cream.
  4. Serve and enjoy immediately.
Ireland [ print this recipe for a White Ape ]

Pineapple Upside-Down Cake Recipe

pineapple upside down cakeFrom Cake Ladies: Celebrating a Southern Tradition by Jodi Rhoden....

As I sat at the counter of the Pine Apple Grocery in Pine Apple, Alabama, James Huggins explained the origin of the town’s name. “Back in earlier days, there was a stage coach route through the area, and a stopping place here – a watering hole for the horses with a pine tree and an apple tree, so they called it Pine Apple.” Although the 2000 census listed Pine Apple as having 148 residents, a patron at the grocery (who was also a member of the City Council) guessed that the population had dwindled to about 70. Downtown Pine Apple, located at the corner of Pineapple Highway and Banana Street, has a post office, a town hall, a library, some empty storefronts, and the Pine Apple Grocery, host of the annual Pine Apple Hunter Appreciation Day. It was through James at the grocery that I met the cake lady Lois Mims, who lives just down the street. Lois makes cakes for her friends and family, and, like many cake ladies, is often commissioned to bake cakes for sale. Lois has a reputation as a cook in her community. “They all call me Big Mama,” she says. “Grown folk call me Big Mama. That’s because I used to do a lot of cooking and feed a lot of people, and I didn’t mind doing it. I enjoy feeding people. It makes me feel good.”

Like many other cake ladies, Lois doesn’t use written recipes; instead she relies on her memory, her intuition, and her experience to craft the perfect cake. “You talking about a recipe? I ain’t got a recipe. I just put my stuff in there, take my head, and use it.” Within minutes of meeting her, Lois proceeded to tell me how she makes several of her cakes, listing from memory the ingredients and methods for egg pie, cooked caramel icing, applesauce spice cake, yellow cake, lemon pie, coconut pie, and pineapple upside-down cake.

She recounted a baking story where she had to rely on intuition (and prayer) to get the right results: “One time I was making pies for some people, but I don’t have money to buy pie crust, and I can’t make them like my mama, so I said, ‘Lord, help me to make these pie crusts for these people because I don’t have no money.’ So I got up and I rolled them pie crusts, and they came out right. They say the pies were nice, they were good.”

Like many bakers, Lois credits her mother with teaching her to bake by feel rather than from recipes. She says, “There was a friend my mother used to cook for. My mother’s name was Allie, and when I was a little girl, he’d say, ‘Allie, she cook out the book!’ And I always thought, I wonder what he’s saying? After I thought about it when I was grown, I said, ‘I know what he’s saying! He’s talking about how good my mamma cooked, and she didn’t have to use a book’”

Lois Mims stopped baking this cake for a few years, but then her children started to ask for it again. Lois bakes her pineapple upside-down cake in a well-seasoned 9-inch cast-iron skillet.

Ingredients:
For the topping:
1/2 stick (1/4 cup) butter
1 cup packed light brown sugar
1 15 oz. can of pineapple slices, drained and juice reserved
1 small jar of maraschino cherries (about 15), stemmed

For the cake:
1 stick (1/2 cup) butter
2 cups self-rising flour
1 1/2 cups sugar
2 large eggs, lightly beaten
3/4 cup milk
2 tbsp reserved pineapple juice from can

Preparation:
  1. Position a rack in the center of the oven and preheat the oven to 375 degrees Fahrenheit.
  2. To melt the butter for the cake, place 1 stick of butter in a 9-inch cast-iron skillet and set it in the preheating oven until the butter is melted but not sizzling. Pour the melted butter into a heat-proof mixing bowl, and set aside. Allow the butter to cool, but not solidify.
  3. Place the remaining ½ stick of butter in the skillet and place the skillet back in the oven, until the butter is melted but not sizzling. Remove the skillet from the oven, and add the brown sugar and stir until the sugar is dissolved; spread the brown sugar mixture into an even layer in the bottom of the skillet.
  4. Place one pineapple ring in the center of the skillet on top of the brown sugar mixture. Arrange five pineapple rings in a circle around the center ring. Cut the remaining pineapple rings in half, and arrange the half-circles around the outside edge of the skillet, pressing them against the sides of the pan, cut ends up. Place a maraschino cherry in the center of each pineapple ring, and rest one cherry in each half-ring against the sides of the pan. Set aside.
  5. Sift the flour and sugar together into the mixing bowl. Pour in the melted and cooled butter, eggs, milk, and pineapple juice. Stir with a wooden spoon until ingredients are just combined and few lumps remain. Gently pour the mixture over the fruit in the skillet. Scrape down the bowl with a spatula to be sure to get all of the batter out of the bowl and into the skillet. Use the spatula to evenly distribute the batter, cover all of the fruit, and level the batter’s surface. Place the skillet on the center rack of the hot oven.
  6. Bake for 40 to 45 minutes, or until the top of the cake is a deep golden brown and a knife inserted into the center batter comes out clean. Remove the skillet from the oven and set it aside onto a heat-proof surface to cool for 5 minutes.
  7. Run a knife around the outside edge of the cake to release any cake stuck to the pan. Place a heat-proof plate, inverted, over the skillet. With gloved hands, grasp both sides of the skillet and plate together, and invert the cake onto the plate. Remove the skillet. If any pieces of fruit are stuck to the skillet, quickly transfer them back onto the cake with a fork. The brown sugar glaze should drizzle slightly around the cake. Allow to cool, then serve immediately. Pineapple Upside-Down cake will keep for two or three days at room temperature, or for up to a week covered and refrigerated.
PREP TIME: 20 minutes
BAKING TIME: 40 to 45 minutes
COOLING TIME: 5 minutes prior to inverting, plus 1 hour before cutting

Recipe courtesy of Cake Ladies – Celebrating a Southern Tradition by Jodi Rhoden


USA flag United States alabama state flag Alabama [ print this recipe for Pineapple Upside-Down Cake ]

Poutine Recipe

poutine
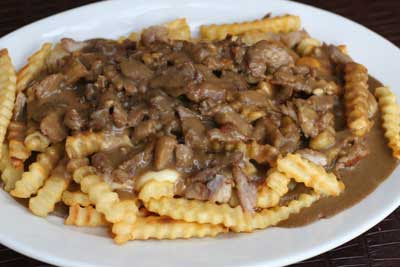
Poutine is considered by many to be Canada's national dish. The name "poutine" is derived from Acadian slang for "pudding" or "a mushy mess" which is an apt description of this delicacy from the Great White North.

Poutine, in its most traditional form, consists a bed of French fried potatoes, topped with cheese curds and rich, brown gravy. The recipe originated in Eastern Quebec in the late 1950s but the inventor of this dish is disputed to this day. Most agree that the recipe for poutine was developed by one of two restauranteurs in the area, Fernand Lechance or Jean-Paul Roy.

Regardless of who invented poutine, today you can find it served throughout Canada and in some parts of the United States. In fact, this recipe is based on a version of poutine that we tried at a restaurant called Senate located in Southwest Ohio. This restaurant is a local favorite for its gourmet takes on regional, short-order specialties such as the Chicago Style Hot Dog. Their version of poutine sticks to the basics with the addition of shredded meat from pork spare ribs - a welcome addition to an already decadent feast. For simplicity, we used frozen french fries that are baked in the oven. If you don't mind doing a little more work, you can use this recipe for French Fries to make them from scratch.

Ingredients:
1 tbsp olive oil
2 tbsp butter, unsalted
2 tbsp all-purpose flour
1 pound pork from ribs, cut into bite-sized pieces
1/2 cup of cheddar cheese curds
1 1/2 cups beef stock
1/2 of a 32oz. bag of French fries (I used Ore-Ida Crinkle Fries)

Preparation:
  1. Preheat oven according to the directions on the bag of French fries.
  2. In a skillet, heat olive oil over medium-high heat.
  3. You will need to divide the pork into two batches and cook one batch at a time in order to maintain the proper temperature in the skillet. Add the pieces of pork to the skillet and cook for about 3 to 4 minutes each side. Do not move the meat while it cooks. You want small bits of browned pork to stick to the bottom of the pan. When the pork has finished cooking, remove it from the skillet and set aside to cool. After it has cooled, cut it into smaller pieces.
  4. Add the second batch of pork to the skillet and repeat step #3.
  5. Place the french fries on a greased baking sheet and place them in the oven to bake.
  6. Reduce the heat of the skillet to medium. Add the butter and flour to the skillet to make a roux. Using a wire whisk, stir the flour and butter mixture constantly until it turns light brown like the color of peanut butter.
  7. Pour the beef stock into the skillet using the whisk to mix it in with the roux to make the gravy for the poutine.
  8. Season the gravy with salt and pepper to taste, stirring occasionally. When the gravy reaches the desired level of thickness, reduce the heat to low.
  9. When the fries have finished baking, top them with the cheddar cheese curds and pieces of pork and reduce the oven temperature to warming temperature. Heat the fries for 5 more minutes.
  10. Remove the fries from the oven and top with the gravy.
  11. Serve hot.
canadian flag Canada [ print this recipe for Poutine ]
Related Posts Plugin for WordPress, Blogger...